banner

Friday, July 30, 2010

Too hot to bake bread? Make biscuits!

flaky tower

Summer has descended on the northwest like a wet wool blanket. It hit 90 in our little fog valley yesterday, which is far too hot to spend much time in the kitchen. This leaves me craving homemade bread - and other baked goodies - but distinctly avoiding the means of making any.

When that happens, I have a go-to recipe: biscuits.

Specifically, I go to one of the most popular recipes on kitchenMage: my Simple Flaky Biscuits. These babies take just under half an hour to make, which is tolerable even in this heat. They are simple enough for small kids to help, convenient since it's summer vacation.

As a bonus, the biscuits make excellent shortcake so bring on the berries, peaches, and other summer fruit. Hey, peach shortcake! I think I have peaches and it's still cool enough to bake. I'd love to chat but I think I hear biscuits calling my name...

Labels: , ,

Click here to continue reading the post and comments...

Sunday, October 18, 2009

Slacker Sunday: Friday Favorites: Fauxcaccia


Welcome to Friday Favorites, where A Year in Bread readers guest blog about their best bread recipes (also sometimes known as Slacker Sunday if we're posting one of our own favorite recipes). If you bake a Friday Favorites bread at home, we hope you'll come back and share your experiences with us in the comments section of that post. Click here to find out how you can become a Friday Favorites guest blogger, and click here. You'll find links to all the previous Friday Favorites at the end of this post.

Susan wrote about Parisian Daily Bread, which this bread is based on, early in our first year, when we dedicated an entire month to Daniel Leader's wonderful book, Local Breads. Leader was generous enough to let us post the complete recipe from the book, with detailed instructions, and help on shaping beautiful baguettes (something many of us struggle with, even after decades of baking). You can find that recipe here: Parisian Daily Bread.

That recipe has been my go-to quick baguette since the first time I made it in the summer of 2007. It is often the companion to a market salad of whatever is fresh at the Farmer's Market this week, a role that used to be filled by focaccia when Don and Kitty of The Inn at Crippen Creek Farmsold bread at the market. I missed the focaccia that was left after dinner; it was perfect with sandwiches and other summer weekend fare.

One day I decided to add a generous dollop of olive oil - okay, a couple of huge glugs - to a batch of
Parisian Daily Bread. The dough loosened up enough to make a flatbread, maybe a little too flat, but the result was not bad for a quick lamb burger. Since then, I have tweaked the recipe a bit and developed the laziest ever method of making bread I really like. I have no idea what it qualifies as technically, but I call if fauxcaccia.


Fauxcaccia Recipe
Ready in a few hours, this not-quite-focaccia is great for those busy days when you crave fresh bread. Squash the dough a bit flatter as it rises for sandwich bread or let it rise higher for slices to accompany dinner. This version is a quick hack and assumes a certain comfort with making bread by feel. You may want to take a peek at Susan's post if you want more specific instructions on this bread.

Ingredients | US volume | metric volume | US weight | metric weight
water - 1 1/3 c | 315 ml | 10.6 oz | 300 g
instant yeast 1 tsp | 5 ml | .2 oz | 5 g
flour 3 1/4 c | 770 ml | 17.6 oz | 500 g
olive oil 1/3 c | 80 ml | 2.65 oz | 75 g
sea salt 1 1/2 tsp | 7 ml | .4 oz | 10 g
fresh rosemary, chopped 1 tbsp (optional)

Combine flour, yeast and water in mixing bowl. Stir until well combined. Pour olive oil in a pool on the edge of the dough, add salt to the oil. Cover the bowl and let it rest 20 minutes.

If you are making dough in stand mixer:
Mix on low for about a minute, until the oil and salt are incorporated. Increase speed to med-high and beat for 5-6 minutes, until dough is sort of silky and smooth. Cover bowl and rest for another twenty minutes. Turn on low for about 15-20 seconds, just enough to knock the air out of the dough and give it a spin or two.

If you are mixing by hand:
Stir dough until the oil and salt are incorporated. Continue stirring vigorously for another minute or two, then turn out onto a lightly floured counter. Knead for about 5 minutes, cover and let rest for 8-10 minutes. (If your arms don't take the workout, you can knead for a couple of minutes, rest for 5 minutes, and repeat a few times. It's pretty forgiving dough.)

Shape the dough:
Once you are finished kneading the dough, shape into a rough rectangle. Place a sheet or parchment paper on a baking sheet and drizzle a little olive oil on it. Place the dough in the middle of the parchment, drizzle more olive oil on top of the bread. Gently poke the dough all over, starting at the center and working out to the edges, careful not to poke all the way to the baking sheet. Continue to do this for the first half hour or so of rising time.


Preheat the oven to 450. If you have a pizza stone, place it on the middle rack and preheat for at least 30 minutes.

Let the dough rise until it has increased in height about 50%. The surface should be a little bit dimpled and rough from your fingers and have a thin coat of olive oil, you may need to brush on a bit more. You can sprinkle a bit of coarse salt or more rosemary on top, too. It makes a pretty loaf.

Bake for about 20 minutes still on the pan, even if it is on the stone. Otherwise, the oil will make a mess.

Let cool completely on rack. (I sometimes brush a little more olive oil on the bread when I take it out of the oven so the crust keeps that lovely sheen.)

Previous Friday Favorites:
Anne's Oatmeal Toasting Bread
Marielle's Overnight Bread/Burger Buns/Cinnamon Roll Dough
Kelli's Pain au et Noisettes ou Pacanes for the People

A Year in Bread Recipe Index

© Copyright 2009 AYearInBread.com, the laid back bread baking blog where tardiness is perfectly understandable—but a meal without homemade bread is grounds for some serious disappointment.

Labels: ,

Click here to continue reading the post and comments...

Friday, February 15, 2008

Beth: Onion Cheddar Breadsticks Recipe

onion cheddar breadsticks
When I was a young'un, I moved from "Baja Oregon" to a very small coastal town in southwest Washington. A town where the locals joked, in some cases bragged, that, upon arriving, you should turn back your clock 20 years - to the '50s. (um, no) A town where, in the only 'ahead of their time' moment I witnessed there, they hated Calif…er, Baja Oregonians with a vengeance.

Well, mostly.

Read the rest of Cheddar Cheese and Onion Breadsticks Recipe

Labels: ,

Click here to continue reading the post and comments...

Friday, November 16, 2007

Ever wondered how to cut an epi?

baked epi
Just in time to impress your friends and family with a lovely epi, or sheaf of wheat, loaf at a holiday dinner, I posted a step-by-step lesson in how to cut an epi. It is actually simple once you have seen it done and it offers a less common alternative to the dinner rolls we have been baking here this month.

Technorati: | | | | | | | |

Labels: , , ,

Click here to continue reading the post and comments...

Friday, October 26, 2007

Beth: Holiday Rolls - Rosemary Fans


Due to a recent move, I have found myself without my usual bounteous herb garden, which is a truly sad thing. While the place we are renting in theOtherCity has a couple of tiny beds with a few herbs in them, it is pretty thin pickin's around here at the moment.

This, as you might imagine, throws a huge wrench in all of my plans for recipes that I was going to write about:
  • Lovage? Nope.

  • Thyme? Not really.

  • Sage? Yes! But sadly, while aromatic, it's got thick leaves and isn't so tasty. (infusions perhaps...?)

  • Basil? Laughter echoes from a back room.

  • Bay? Amusingly enough, yes. There is a sweet bay 'tree' that has a dozen leaves on it. Maybe I can use one this winter.

  • Mint? How can there be no mint?

  • Rosemary? As I have said elsewhere, the three small rosemary plants are a saving grace.

Luckily for me (and Kevin and Susan who don't have to fill in my spot this week), my chosen recipe for this week uses rosemary, which available pretty much year round here - even in my tiny little herb garden. The bread dough is simple, another derivation of Peter Reinhart's polish baguettes from Bread Baker's Apprentice, and shaping the rolls is quick, easy and (as you can see in the photos) not an exact science. Grab the kids and let them help.

Click to enlarge

kitchenMage's Rosemary Fans
Ingredients | US volume | Metric volume | US weight | metric weight
Starter:
water 1/2 cup | 115 ml | 4 ounces | 112 grams
bread flour 7/8 cup | 205 ml | 3 3/4 ounces | 105 grams
whole wheat flour 1/2 cup | 112 ml | 2 1/4 ounces | 62 grams
instant yeast 1/8 teaspoon | <1 ml | a pinch | seriously
Dough:
water 1 cup | 235 ml | 8 ounces | 224 grams
whole wheat flour 1/2 cup | 115 ml | 2 1/4 ounces | 63 grams
bread flour 3 1/4 cup |765 ml | 14 1/2 ounces | 466 grams
instant yeast 1 teaspoon | 5 ml | 1/8 ounce | ~3 grams
olive oil 1/8 cup | 30 ml | 1 ounces | 28 grams
salt 1 tablespoon | 15 ml | 1/2 ounce | 15 grams
Filling:
olive oil 3 tablespoons | 45 ml | 1 1/2 ounces | 42 grams
rosemary fresh, chopped 1 tablespoon | 15 ml

Notes: You can substitute almost any other savory herb for rosemary, although fresh herbs really do work best for this.

Mixing the starter
In mixing bowl, combine starter ingredients and mix until well combined. Cover and let rest on the counter for about two hours until it is very bubbly. (You can shorten this to ~20 minutes or wait as long as 4-5 hours. You can also refrigerate the starter for 24-48 hours after it bubbles.)

Mixing the dough
Add the water and whole wheat flour to the starter and stir to combine. Let the mixture rest for a few minutes so the flour can hydrate. Add the rest the dough ingredients except the salt and mix until everything is integrated. Cover and let rest for 20 minutes.

Click to enlarge

Sprinkle the salt on the dough and continue mixing (or kneading) until it is firm yet supple and smooth. (about 6-8 minutes by mixer, 10-12 by hand) As always, remember that you may need to add a bit more flour.

Same recipes, different bread

I think every baker needs a few never-fail recipes in their back pocket. Recipes that they can play with endlessly with a fair degree of certainty of success. This recipe is a variation of one of my standby recipes: a polish baguette from Peter Reinhart's Bread Baker's Apprentice. If I had to pick just a few breads to bake all the time, this would be one of them. In its original form, it makes wonderful baguettes and is well suited to being shaped for specialty breads like epis. and I have been able to corrupt... err, vary it pretty endlessly over the years.

I have had success with up to ~60 percent whole wheat flour; I haven't tried more but my guess is that, with a bit of extra yeast and a pinch of gluten, this would work with almost (or entirely) whole wheat. 75 percent white whole wheat should be a breeze — and if I could find mine in the boxes stacked in the pantry, I'd have tried it. (Someone should do it and report back.)

If I want my bread to have a slightly more open crumb, I add a bit of additional water, but just a few teaspoons. The dough is forgiving and, once you have made it a few times, you can easily feel when its tolerances are being stretched.

In fact — confession time — I once made a double batch of this bread. Except I didn't double the yeast. And I tripled the oil. (don't ask, it was late, I was rushed and had no business driving a KitchenAid...) As I kneaded the dough, stumbling my way through a series of "this feels all wrong" corrections, I slowly figured out how badly I had screwed up. Ever the good food writer, I trudged on, determined to take photos for an article titled "How to waste two pounds of flour" that I would write someday. Except for one problem: the bread was fine. It wasn't great, but it was good. This recipe earned its place in my back pocket that day.

Roll the dough in flour and place it in a clean bowl. Cover the dough and let rise until doubled in bulk (about an hour).

When the dough has doubled, turn it out on a lightly floured counter and flatten into a rectangle with your hands. Let the dough relax for a minute while you prepare a muffin tin by lightly rubbing each cup with olive oil.

Using a rolling pin, roll the dough into a 12x18 rectangle. If the dough starts resisting and springing back, let it rest for 5 minutes and then finish rolling.

Brush the dough with olive oil and sprinkle liberally with chopped rosemary.

Cut dough in half and lay one piece of dough on top of the other. Repeat this process once so that you have a single four-layer stack that's about 6x9 inches in size.

The shape of the stack of dough determines exactly how you cut the individual rolls. I usually cut the stack into thirds and then each of those pieces into four rolls. Like this. (It doesn't matters if one side is all uneven, like these outside edges, as long as you put a cut edge facing up in the muffin tin, this will work just fine.)

Cover and let rise until doubled in bulk, about an hour. Bake in a preheated 425F/220C. Bake bread for 25 minutes or until golden brown (~195F/90C internal temperature). Cool rolls in pans for 10 minutes and then place on rack to finish cooling.
Flickr set with additional pictures of shaping.

Technorati: | | | | | | | | |

Labels: , , , ,

Click here to continue reading the post and comments...

Saturday, September 22, 2007

Beth: Honey wheatBerry Bread Recipe

honey 'n wheatBerries

He’s as sweet as Skamokawa honey
Just like honey from the bee.
Tupelo Honey, with apologies to Van Morrison

Sometimes it is, as the kids say, all about the boy.

We all know people who have done odd things for love: run up multi-thousand phone bills, changed names and careers, moved to a city they would never have considered otherwise, or tried to replicate a mass-market loaf of bread.

Um, yeah.

Although Kevin once referred to me as one of the technicians here, I am truly a member of the magical improvisation class – hence the kitchenMage name. It’s just that I study theory natively and, having been in the kitchen since I was tippy-toe to a flour bin, I have learned many aspects of theory well enough to look technical even while making it up as I go along. (note to kids: this is a handy skill, useful in many areas of life: cultivate it)

Sure, I use recipes... every now and then. Sometimes I even use the same amount of the various ingredients as the person who wrote the book. Not always, though — I often use recipes only to provide a rough outline, which I gleefully color outside of. Truth be told, I have had to force discipline on myself to solidify a recipe long enough to post it here.

As you might imagine, I am not a huge fan of deconstructed "famous recipes." I am not likely to buy most prepackaged food, why on earth would I want to go to the effort of creating my very own homemade version of that stuff?

But then there was the boy.

This person, who shall remain 'nymless, was raised on Oroweat Honey Wheat Berry Bread, developing a deep and abiding affection for the stuff. I can see why: as commercial sandwich loaves go, it's pretty good. Dense but not heavy, a hint of sweetness and a rich taste of grain, it is particularly good toasted with a smear of butter and honey. So while it just kills me to pay three bucks a loaf for sandwich bread, I did. For quite a few years.

loaf of wheat berry breadThen Oroweat started making a fluffier version — wider slices, a bit more yeast, lighter color and flavor. Sold it in two-packs at Costco at a fairly reasonable price. Just one problem: it tastes like cheap, fluffy bread you buy in two-packs.

Now the old stuff — the good stuff — is hard to find and closer to $4 a loaf when you can lay hands on it. Clearly, something had to be done and about five years ago, I decided to. That's a long time to work on a single recipe, but it was worth it.

There is, after all, the boy. And he likes it.

kitchenMage’s Honey wheatBerry Bread
This recipe makes two large (slightly over 2 pound) loaves or ~18
US Volume metric Volume US Weight metric Weight
water 3 cups 800 ml 24 ounces 675 grams
Wheat berries 3/4 cup 175 ml 5 ounces 140 grams
Milk, room temp 3/4 cup 175 ml 6 ounces 170 grams
Whole wheat flour 1 cup 235 ml 4 1/2 ounces 125 grams
instant yeast 1 tablespoon 15 ml 3/8 ounce 12 grams
Honey 1/4 cup 60 ml 3 ounces 84 grams
Butter 1/4 cup 60 ml 2 ounce 56 grams
Bread flour 6 1/2 cups 1525 ml 29 1/4 ounces 820 grams
salt 1 tablespoon 15 ml 1/2 ounce 15 grams

Note: Each batch of wheat berries I get seems to cook in a different amount of time and absorb a different amount of water. This means that, more than many bread recipes, you may need to adjust the flour on this each time you make it. I add ~5 cups to start and then sprinkle more in as it mixes in the kitchenAid. Most of the time, I end up using ~6 1/2-7 cups, but your mileage, as always, may vary.

Preparing the wheat berries
Combine wheat berries and 3 cups of water in a medium sauce pan. Cover and set aside to soak for an hour. After an hour, leave pan covered and cook on medium heat, stirring occasionally, until wheat berries are soft and popping open. The water level will be reduced by ~1/2 cup and the wheat berries will be fat and soft. Let cool and prepare for use in dough — see sidebar for more information.

Do you like your wheat berries smooth or chunky?

There are two distinctive states of wheat berries: smooth and chunky. You need to decide which form you want your wheat berries to take and prepare them differently based on your desired results.

On one end of the continuum, there is the nuts-and-seeds style of bread, with fairly intact wheat berries. While I like this effect occasionally, particularly when making rolls (add a smidge more yeast, too), the berries have a tendency to stick out of the dough and aren't what I usually want from this bread.

Totally opposite this is the Oroweat bread that set me on this quest. This bread, oddly enough, has no discernible wheat berries, something which I always attributed to superior industrial wheat berry smooshing technology — I think I pictured something involving oompa loompas — but now I know the truth. There are no wheat berries in their bread! In fact, the first ingredient is cracked wheat! Go figure.

Lacking superior oompa-loompa based technology, the easiest way I have found to smoosh these babies is with an immersion blender. A regular blender works reasonably well, but I was less impressed with the results from the food processor.
In any case, let the cooked wheat berries cool to body temperature, ~100F (38C) and then smoosh, or not, to your heart’s content.

Mixing the dough
In mixing bowl, combine wheat berries, milk, yeast and whole wheat flour. Mix until well combined, cover and set in a warm spot until bubbly, 20 - 30 minutes.

Add the softened butter, honey and 5 1/2 cups of bread flour. Mix until it forms a shaggy mass. Continue to add flour, a tablespoon or two (or more at first), until the dough stops readily absorbing it. Mix for another minute, two if mixing by hand. The dough will still be a bit rough. Cover and let rest on the counter for 20 minutes.

If you are using a mixer: Add salt. Use the dough hook and mix it on medium for ~5 minutes, adding more flour a tablespoonful at a time, if needed, until the dough is fairly smooth. Turn it out on a well-floured counter and knead for a few minutes, until the dough is like a baby's bottom — given the wheat berries, perhaps it’s a baby with diaper rash. (sorry)

If you are making the dough by hand: Add salt. Spread a cup of flour on the counter and knead for 4 - 5 minutes, adding more flour if needed. Knead until the dough is, um, ready as described, perhaps a bit too graphically, above.

sliced wheat berry breadRoll the dough in flour, put it in a clean bowl, cover and let rise until doubled in bulk (about an hour).

Turn the dough out on a lightly floured counter, divide in half and shape into loaves. Grease two loaf pans. Put the shaped loaves in the pans and let rise until doubled in bulk (about an hour).

Preheat oven to 375F (175C). Bake bread for 45 minutes or until golden brown (~195F/90C internal temperature). Turn out of pans onto cooling rack for at least an hour.

Complete flickr set of kitchenMage's Honey wheatBerry Bread

Technorati:

Labels: , , ,

Click here to continue reading the post and comments...

Friday, September 14, 2007

Beth: Feta & Chives Cornbread Recipe


As the days shorten and temperatures take a nightly dive, my food cravings begin to turn towards fall's hearty soup and stew offerings. It's not that I am done with summer — there are still lots of tomatoes on the counter and the herb garden is bursting with late summer goodness – it's more that I feel the need to diversify a bit. Hedge my bets against the day the sun doesn't shine so brightly.

Maybe it goes with the simmering pot of blueberry habenero chutney, another sure sign of fall, or perhaps it's just absence making the heart grow fonder, but the other night I found myself pulling a container of someoneElse's chili out of the freezer.

A brief digression may be called for here. Around our place, there are several levels of heat in food: warm, hot, hot, hot, and GeorgeHot. The latter refers not to George Clooney but rather is named for a friend who likes really hot stuff – a high point of one of George's recent vacations was discovering a tourist shop in a small Washington town with a shelf full of one of his favorite hot sauces from New Zealand...on sale. someoneElse has been working on making something so hot that George is satisfied. Said satisfaction may involve post-tasting skin grafts on his tongue. I, unfortunately, get sideswiped by incorrectly labeled things on occasion. This chili said hot, I swear.

Where was I? Oh yes, chili... freezer.

The plan was simple: chili, salad, bread. A quick and easy dinner that could expand to include the friend who called from the road and was invited to join us. I was a happy mage.

Except that the month of the broken oven (now over, thank the Flying Spaghetti Monster!) left me with darned little in the way of bread in the house. Nothing, actually.

Checking the clock, I realized that all I had time for was some sort of quick bread. Chili...quick bread...it must be cornbread!

As the only part of the meal I could claim to have worked on, though, the cornbread had to be special. A peek in the refrigerator uncovered feta cheese. I can work with that.

Google "quick bread" + feta and I see this sentence: "Cornbread is a quick bread." Thinking, "Ah, cornbread, with a reference to feta somewhere - that must be a sign" I clicked on the link.

Kevin's Cheese Bread. Um, err, is that my site?

Is that a sign?

If so, it was off by one post, because I didn't have sour cream, which looks essential to the cheese bread recipe. What ended up catching my eye was Susan's Savory Cheese and Scallion scones, for which I didn't have cream cheese.

(Am I the only person who gets this phone call: "Hi, do you happen to have two and a half pounds of cream cheese in the refrigerator?" Seriously, that was an actual call from yesterday. It's sad that I didn't because there was cheesecake involved and I am sure I could have claimed a slice. note to self: stock up on cream cheese)

Click to enlarge

Taking my inspiration from Susan's scones and applying it to my original idea of cornbread, I came up with feta and chive cornbread (because I didn't have scallions either). Baked in a preheated cast iron skillet, this came together in minutes and was ready to eat in under an hour. Which is about how long it takes to heat chili, make a salad and clean enough of the dining room that you can eat at the table.

Oh yes, the chili. The hot+ chili. I mean the georgeHot chili. It's enough to make a mage glad there was a lot of cornbread.
kitchenMage's Feta Chive Cornbread

Ingredient wolume US wolume metric weight US weight metricFlour 1 1/2 cups 355 ml 6 3/4 oz 190 gr
Cornmeal 1 1/3 cup 295 ml 6 3/4 oz 190 gr
Salt 1 1/2 tsp 8 ml 1/4 oz 7 gr
Sugar 2 tsp 10 ml ~1/2 oz 14 gr
Baking soda 3/4 tsp 4 ml 1/8 oz 3-4 gr
Baking powder 2 1/2 tsp 13 ml 3/8 oz 11 gr
Feta cheese crumbled 1/2 cup 20 ml 3 oz 85 gr
Chives fresh, chopped 1/4 cup 60 ml 1/2 oz 14 gr
Eggs 3
Buttermilk 1 1/2 cup 355 ml 12 oz 335 gr
Butter 1/3 cup 80 ml 2 5/8 oz 75 gr

Preheat oven to 425F (220C).

If you are making this cornbread in a cast iron skillet or similar heavy dish, and I do recommend it, place it in the oven while it preheats. Otherwise, grease a 10" round pan and set aside.

Place flour, cornmeal, salt, sugar, baking powder and baking soda in bowl and stir to combine. Add crumbled feta cheese and chopped chives and toss gently to coat.

Beat eggs lightly and combine with buttermilk. (If you don't have buttermilk, put 2 tsp of white vinegar in a measuring cup, add milk to the 1 1/2 cup mark and let sit in a warm place for 5-10 minutes before using.)

If you are not using a preheated baking pan, melt the butter, let cool a bit and add to liquid ingredients.

Add the liquid ingredients to the flour mixture and mix gently until just combined.

If you are using a preheated pan, cut the butter into several pieces and toss them into the hot pan just before adding the batter. Otherwise, just add batter to pan and place in preheated oven.

Bake at 450° for 25-30 minutes, until golden brown. Turn out onto rack to cool for a few minutes before serving.

Technorati:

Labels: , ,

Click here to continue reading the post and comments...

Friday, September 07, 2007

We have one winner!

Where's the darned drum roll when I want it?

It is our great pleasure to announce the winner of the random drawing for a signed copy of Local Breads: Sourdough and Whole-Grain Recipes from Europe's Best Artisan Bakers.


Bling! Bling! Bling!

Our first winner is:

Robin of Around the Island, written from around her kitchen island in Israel. She tells me it is not a food blog but I see recipes, plates of tasty looking food there, plus: duh, the name. grin

Robin says the book is for her husband, who does most of their baking, some with the help of very small people - which is always challenging! Maybe if we ask nicely, Robin will share pictures and stories of breads from her, I mean her husband's, new book.

We'll be back in a day or two with the winner for the best story. Because choosing a winner is hard. Very hard.

Technorati: | | |

Labels: , ,

Click here to continue reading the post and comments...

Thursday, September 06, 2007

The Lost Stories


When we started our contest to give away a copy of Local Breads: Sourdough and Whole-Grain Recipes from Europe's Best Artisan Bakers, we thought that perhaps a few people would share an amusing story of bread-baking and we were right. A few more — maybe more than a few — shared heart-warming stories of baking bread, while others wrote a poem or a song. We have had a blast reading all of these entries and would like to thank you all again for taking the time to join in.

We were, however, dismayed when we got a message from someone asking why we hadn't posted his story in the final roundup because we certainly didn't mean to leave anyone out. A lot of work went into your stories and they are each wonderful in their own way. This got me started thinking about missing entries and where they might have gone... a train of thought that stopped at a gMail spam folder. A spam folder that is apparently a part of the Bermuda Triangle since it held all sorts of missing things. Including a number of contest entries.

Oops.

So, with our apologies we present the actual last round of bread stories to be followed shortly by announcements of winners. Four of them.
What? Did she say four?
Yes, I believe she did!
But... I thought it was two?
It was but now isn't.
So FOUR people get copies of Local Breads?
Cool!
Yes, we found two more copies of the book so we get to give copies to two lucky runnersup (er, runnerups?) ["runnersup" - Ed.]. So look for four winning names, starting tomorrow. In the meantime, on with the stories.

Zach tells us a story of a man, a woman, and their wild love for wild yeast:
Two weeks before my wedding, I made sourdough starter — my second attempt ever. I wanted to bake communion bread for the wedding service to be held on my family’s farm. My fiancée, Kira, and I were excited about using wild yeast as leaven — some of it from the very air of the farm on which we would marry — but I was nervous that it wouldn't be ready in time.

I mixed water and flour, and refreshed it daily, putting the starter in the farmhouse's basement to keep it safe from the July heat. I made frequent trips down the worn, wooden steps to check on it, hoping the yeast were happy with what I had given them. After about a week, it was bubbling with life, ready to make bread!

Two days before my wedding, I made a firm starter. The next day, I mixed up the dough, fermented it, shaped it into boules, and put it in the refrigerator. I woke up on my wedding day with two thoughts in my head: "Today I will marry the woman I love," and, "I need to get the bread in the oven!" The sourdough baked into some of the best loaves I have made. It was so special to carry it down the aisle alongside some homemade wine from Kira’s grandfather. I know I will often think of that feeling as I am baking bread, and the smell fills up the kitchen like it did on my wedding day.

(Beth dabs eyes with tissue)
Cerddinen offers excellent advice at the start of her tale of making Susan's Italiano No-knead Bread: "Make sure to completely read and understand the instructions." Excellent advice which she, of course, ignored. The story sounds like my bread (this is Beth of the long, cold rise) as her dough goes in and out of the refrigerator because "I'm not waiting till 1 A.M. to put this sucker in the oven." (Kevin, she served it with North Carolina Style Vinegar Based BBQ Pork. Is the BBQ pig a secret message to you?) [The Legions of the Slow Order of the Pig are as grains of sand. - Ed.]

Don Luis shares his journey while seeking a new way of making his much missed crusty Italian bread after a move to Puerto Rico where basic ingredients including instant yeast and unbleached flour are impossible to find. Starting with a simple nine-step recipe for Pan de Luis and ending with a two-phase, 19 step bread-building process at Pan de Luis Redux, Don Luis seems to have mastered bread in a land that is 1400 miles from the nearest Whole Foods.

Druzsbaczk writes from Hungary (where 'cock' means water valve) [Thanks for that clarification - Ed.]
My family is gourmet, and we like delicate food as gifts, especially homemade things. Last year I planned to bake a german-style sourdough bread for my father. The procedure needs about 5 days.

Everything had gone well, on 23rd December morning I made the last step of feeding my sourdough, and wanted to wash the used spoon and other dishes. As I opened the cock, suddenly it dropped out, and stayed in my hand! I had to call my Father (excellent handyman), he came over in 20 minutes — so I had to cover all the bread's tracks: bowl, spoon, flour...

He fixed my cock, and did not realized the present sourdough — everything's OK! I baked the bread, it looked nice, father was surprised and happy, and we tasted it at dinner.

Bad surprise: tasty, but absolutely saltless! Unfortunately I forget to mix in salt before baking — this was the "sacrifice" of the cock...
Huiping checks in from Singapore to tell of her first attempt at bread, which looks awfully tasty for being deemed a partial success. She also has some photos of wonderful looking cranberry & black currant scones. And a cat who knows how to make himself at home at the table.

Baking Soda digresses mightily as she talks of being a stay-at-home-mom and how she started her blog. Then by way of making us all jealous, she bakes five kinds of bread from three new cookbooks. That's one busy woman!

Over at Anomalous Cognition, Jenny, well actually Eric, poses one of the eternal questions of life: "Time passed. I grew a garden, with a big parsley patch and a tomato plant (okay, twelve), and one day we decided the time had come to make tabbouleh fresh from the garden. 'And you'll make your pita bread?' Eric said to me. 'Maybe this time it will poof.'"

You have to go read her contest entry "Pitas" to see how it turns out.

Speaking of pitas and poofiness, BC of Beans and Caviar also made pita bread. Oddly, it was the first bread she ever made and she had never seen a pita before! Perhaps the title of the post "Pita Footballs" gives you a hint of what she encountered.

That's it for today. Check back tomorrow for the first winner of an autographed copy of Local Breads.

Technorati: | | | | | |

Labels: , ,

Click here to continue reading the post and comments...

Thursday, August 16, 2007

Beth: Quick Breads - Blueberry Muffins


My oven is on the blink. More precisely, it's on the not-blink. As in the electronics are dead, the lights don't blink and the oven doesn't heat. The poor thing died about ten days ago and I am still doing research on its replacement — leaving me ovenless. Not to mention in baking withdrawal. As some people might say, I am in my dark place.

Note to readers: if you have suggestions for a reasonable replacement, please comment. If you happen to work for a place that makes awesome stoves and would like me to test one and report, drop me a note.

As luck would have it, however, my oven blinked yesterday. Briefly. Just long enough for me to bake a batch of muffins for this article.

Click to enlarge

Not knowing how much of a window I had before the touchpad decided to be untouchable again, I decided to try several variations on my usual muffin recipe all at once. I knew going in that this might not be such a great idea — heck, I am a geek and know to my bones that you only change one variable at a time because otherwise you don't know which change created a particular effect. Sort of blows the point of experimenting.

With this firmly out of mind, I decided to try a new take on my trusty blueberry muffin recipe. I have long wanted a blueberry muffin that is somehow more enticing than what you usually encounter. My favorite description of my food is 'complex' and most blueberry muffins are anything but. The idea was to create a muffin that was a step towards cake, but just a single step, while adding some depth to the flavor. Here are the individual changes and my thoughts on each of them:
  • Beaten egg whites: Taking a suggestion from Bittman's How to Cook Everything, I hoped the additional loft of stiffly beaten egg whites would lighten the bread. Not so much. While the whites looked good going in to the batter, there was no discernable effect on the finished product. Conclusion — extra effort for no reason.

  • Resting the batter after portioning: This old trick, often found in cornbread recipes, gives the leavening time to form itty-bitty bubbles in the batter. When the muffins are put in the oven, these holes expand from the hot air and result in a higher crown. Sadly, this also gives the berries time to sink to the bottom of the muffin tins. Conclusion — save this for quick breads without such extra ingredients.

  • Silicone muffin pan: What a mess! Everything stuck to the bottom and they came apart in pieces when I tried to remove them after baking. Conclusion — What the heck was I thinking?

  • Lavender: Blueberries and lavender go together like bread and butter, maybe better. Conclusion — this is the only keeper from my experimentation.

The oven? It's back on the blink. But at least I have fresh blueberry muffins to console myself with.
kitchenMage's everMorphing blueberryMuffins
Makes one dozen normal muffins (or 6 huge ones)

sugar 1/2 cup | 120 ml | 3 1/2 ounces | 100 grams
lavender buds (fresh) 1 teaspoon | 5 ml |1/8 ounce | 5 grams
egg 1
butter melted and cooled 3 tablespoons | 1 1/2 ounces | 42 grams
low-fat sour cream 1 1/4 cups | 295 ml | 10 3/4 ounces | 300 grams
all-purpose flour 1 3/4 cups | 415 ml | 7 7/8 ounces | 220 grams
baking powder 2 teaspoons | 10 ml | 1/8 ounce | 7 grams
baking soda 1 teaspoon | 5 ml | 1/16 ounce | 5 grams
salt 1/8 teaspoon | ~1 ml
blueberries 1 1/4 cups | 295 ml | 5 5/8 ounces | 160 grams (if fresh simply wash; if frozen leave them in the freezer until you are ready to use them)
optional butter and cinnamon sugar for topping after baking

Preheat oven to 375°. Have all ingredients, except frozen blueberries, at room temperature. Prepare muffin pan with paper cup liners.

Berries for Muffins

When selecting blueberries for muffins, there are a few things to keep in mind.

Smaller berries are better. There is a relationship between the proximity of berries to each other and how muffins bake. Large berries sink to the bottom of the batter more quickly resulting in a layer of berries touching each other with not much batter in between and thus a much wetter muffin bottom than is desirable.

Less is more. It is tempting to put 'just another handful' of berries in your batter but resist. Too many berries will also leave you with wet muffins that bake unevenly.

Stay cool. If the berries are frozen, keep them that way until you put them in the batter. They are less likely to disintegrate and leave you with blue muffins.

Don't eat them all while picking. While it is tempting to stuff one fistful after another in your mouth while standing in the berry patch, you really should leave a few for the muffins. Or is this just me?

1. Grind the sugar and lavender in a blender briefly to chop the buds up. (use a little less lavender if you have dried buds)

2. In a medium-sized bowl, beat the egg briefly with a wire whisk to lighten. Add the sugar and continue to whisk until you can no longer feel any resistance from undissolved sugar.

3. Add the butter to the bowl and mix briefly to combine, then add sour cream and whisk until mixture is smooth and homogenous. (You can whisk an additional minute or two at this point, if your wrist can take it, to aerate the batter, making the muffins a bit lighter.)

4. In another bowl, combine the dry ingredients and stir thoroughly to mix and eliminate lumps. (I use a 6" handheld sieve — the muffins come together more easily if the flour is well aerated.)

Click to enlarge

5. Add the blueberries to the dry mixture and toss them gently for a few seconds to coat the berries.

6. Add liquid mixture to the flour mixture and combine with a few quick folds.

7. Scoop batter into muffin pan (a 4 oz scoop is about the right size).

8. Bake for about 25-30 minutes until tops are golden brown. Turn out on wire rack to cool.

9. If desired, brush still warm muffins with melted butter and sprinkle on a bit of cinnamon sugar.

Technorati: | | | | | | | | |

Labels: , ,

Click here to continue reading the post and comments...

Friday, July 27, 2007

Beth: Italian Breads From Local Breads - Filone


L et's start with the obvious confession: I'm off my game. Way off my game. So far off that I don't even have a razor blade in the house to make a decent slash in an unbaked loaf of bread. Look at that picture! <hangs head in shame..>

Seriously, it has been almost five weeks of one handed cooking, baking, driving, and sitting on the couch with a good book (no, not that book, I'm swiping theKid's copy this weekend) — although, truth be told, there's been a lot more sitting on the couch and than cooking and there's been virtually no baking. (In fact, I'm back to using speech recognition for my writing, and in its usual slightly ironic take on reality it just wrote "virtually no drinking" instead of "virtually no baking" and that's just wrong, because there has been drinking.)

On the one hand, taking a break from a common, almost daily, activity is a sure way to remind you that absence truly does make the heart grow fonder. And it's been very easy to restrain myself from rushing into the kitchen because I usually have a pound or so of neoprene, Velcro, d-rings and let's not forget those lovely pieces of metal strapped to my wrist as a reminder of what I'm not supposed to be doing. Plus, pain as a backup reminder.

So when my copy of Daniel Leader's Local Breads: Sourdough and Whole-Grain Recipes from Europe's Best Artisan Bakers arrived I was conflicted, some might say of two minds. (others might say I'm always a bit schizophrenic so two minds is a slow day inside my head... but I digress.)

Local Breads: a mini review

Leader's journey across Europe in search of local bread specialties opens with a brief primer on ingredients, followed by a walk through of the stages of baking bread. A chapter on sourdough and other starters is followed by a collection of frequently asked questions about bread baking. These are particularly useful for beginning bakers who may be unfamiliar with the science of baking bread.

Each of the nine regional chapters opens with a bit of context, history, and local color as Leader invites you along on his quest for the taste of each place—the terroir, if bread can be said to have such. (I am enchanted by his description of Amos DeCarlo's dream-inspired Ferris wheel for biga!) Leader examines what sets apart one area's bread from another, and then offers some general advice about how to reproduce a particular type of bread, including things like how to blend flour to approximate European flours not commonly available here in the states. After the recipes, a brief FAQ about that collection of bread recipes wraps up each chapter.

Information about tools and techniques, such as instructions on shaping loaves, are accompanied by lovely sketches, which add an appropriately artisan charm to the book. The photographs, while straightforward and simple, actually show what the bread should look like rather than how esoterically artistic the photographer could get. I kind of like that.

On the downside, there are some inconsistencies in measurements that leave me wondering. In a single recipe, this recipe in fact, 1/3 of a cup of water weighs either 2.3 ounces or 2.6. (It's 2.66) I suspect this is due to Leader's stated preference for weighing everything in grams and the subsequent rounding during conversion back to volume, but it's confusing and I wish it had been addressed directly—as is, it looks like bad editing, which I am pretty sure is not the case. I would recommend using the metric weights, which seem to line up with the baker's percentages and which are, in any case, seemingly what Leader used when developing the recipes.

But the true test of any cookbook is the recipes: are they any good?

On that score, I am giving this book fairly high marks. Susan has been thrilled with the two recipes she has tried and Kevin says the focaccia is the best he's ever made. While I am at a loss to explain the gap between the glam shot of the filone in the book and what I made, I am also willing to take some of the responsibility — and since we're interviewing Leader soon, I have a chance to ask him about it.

I adore new cookbooks, especially baking books, which I am somewhat more likely to actually use rather than simply drooling on while browsing. Bread books are at the very top of my list and Susan has been talking about this one for months. (Confession: I have somehow never laid hands on a Daniel Leader book prior to this one.) Susan has been a happy acolyte of Leader, however, she raves about him, is a one-woman Bread Alone selling dervish — she was also darned adorable the first time she got actual e-mail from him! Now, I must go buy a copy of Bread Alone and read it while I finish healing.)

On the other hand... there's the other hand, the left one to be precise. When turning the pages the wrong way hurts, the gap between tempting recipes and hand in dough looms large. Fortunately for me, I had a deadline pushing me in that direction of the kitchen and a Kitchen-Aid mixer waiting for me on the counter when I got there.

My month on the couch with my copy of Local Breads left me with about a dozen recipes I really wanted to try: sourdoughs, whole wheat sourdoughs, German rye, even a dark Silesian (Polish) rye that just be one of those lost breads of my youth, and a number of Italian breads, including the famous saltless Tuscan bread. Susan shined up her pointy hair and made an executive decision that we were going to make Italian breads, which mostly use a biga starter that takes just a few minutes to make and ferments in less than twelve hours.

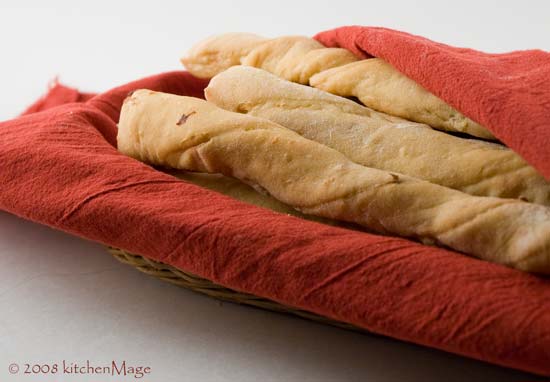
Once the parameters were narrowed, my choice became fairly obvious, apparently to everyone. When I told Susan and Kevin that I was making Rosemary Filones, they both said "of course you are". (Hmm, was it the herb garden that gave me away?)

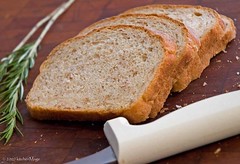
In some ways this was a great choice of recipes, I think one of the best things you can do to homemade bread is add rosemary and olive oil. Really, try it sometime. Almost any non-sweet recipe is improved by adding fresh rosemary and olive oil. In that department this bread did not disappoint, chopped fresh rosemary and a healthy dose of olive oil helps produce a loaf of bread that tastes like a summer afternoon in Italy. We served it to visiting friends two nights in a row, at their request.

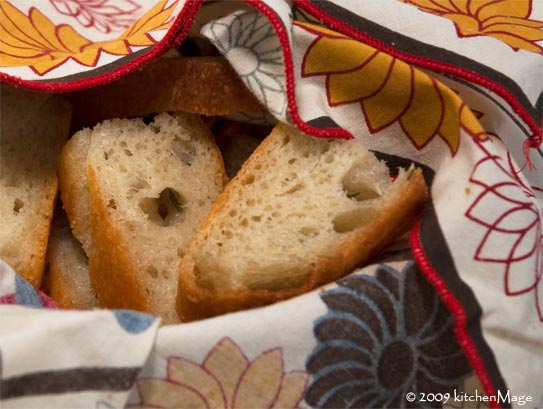
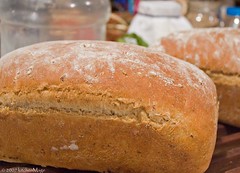
But the crumb... Well, I said I was off my game.

I made this bread twice and both times produced a loaf that I would be happy to use for sandwiches. The crumb is evenly dense with a lot of small holes and the crust is distinct yet not too chewy. Sadly, this is not supposed to be a sandwich loaf.

Click to enlarge

According to the picture in Local Breads, this bread should have a gorgeous open crumb and a substantially thinner crust. See my bread? See the photo in the book? Do they look the same to you?

Tasty enough but just not it.

I think that this is due to a combination of the recipe and my inability to do my usual hands-on approach to a new bread recipe and in this case a new cookbook author as well. The inability to manipulate the dough by hand really gets in the way of making all of the tiny adjustments that go into making any bread recipe work in real life. (The book also seems to have some inconsistency in the conversions of measurements and maybe this is a recipe where that is a factor.)

So this morning I made one last batch with bread flour, which should better support that hugely open crumb — but which also absorbs more water than AP flour and I didn't really adjust for that — and it was a bit better. Not better enough to make me grab the camera, just a little bit.

I think that I can do better with this, and when I can use both hands again, I shall try. Next time: More water, a hotter oven for better oven spring, and real slashes. In the meantime, I want to see what the rest of you do with it. Please bake some and show me what you make.

Rosemary Filone
This is the original recipe from Local Breads in its entirety, with my baking notes [in brackets].

Allow 9 to 17 hours to mix and ferment the biga;
10 to 15 minutes to knead;
1-1/2 to 2 hours to ferment;
45 minutes to 1 hour to proof;
30 to 40 minutes to bake

Makes 2 loaves (~20 ounces/560 grams each)

Equipment
baker's peel or rimless baking sheet
parchment paper
bench scraper or chef's knife
baking stone

Biga<
Ingredients | US volume | metric volume | US weight | metric weight
water tepid (70 - 78F/21-26C) 1/3 c | 80 ml | 2.3 oz | 65 g
instant yeast 1/2 tsp | 2.5 ml | .1 oz | 2 g
unbleached all purpose flour 2/3 c | 160 ml | 3.5 oz | 100 g

Click to enlarge

Prepare the biga
Nine to 17 hours before you want to bake, prepare the biga. Pour the water into a small mixing bowl. With a rubber spatula, stir in the yeast and flour just until a dough forms. It will be stiff like pie dough. Dust the counter with flour and scrape out the dough. Knead the dough for 1 to 2 minutes just to work in all the flour and get it fairly but not perfectly smooth. (This is a very small amount of dough, about the size of a plum.) Lightly oil the mixing bowl. Round the biga and place it back in the bowl. Cover the bowl with plastic wrap. Leave at room temperature (70 - 75F/21 - 24C) for 1 hour, then refrigerate it for at least 8 and up to 16 hours. The biga will double in volume (to about the size of an orange) [Mine came to slightly above the one cup line on a pyrex measuring cup], becoming glossy and porous, and will smell mildly acidic.

Bread dough
Ingredients | US volume | metric volume | US weight | metric weight
biga about 1 cup | 237 ml | 5.9 oz | 167 g
water tepid (70 - 78F/21 - 26C) 1 1/3 c | 320 ml | 10.6 oz | 300 g
instant yeast 1 tsp | 5 ml | .2 oz | 5 g
unbleached all purpose flour 3 1/4 c | 770 ml | 17.6 oz | 500 g
sea salt 2 1/4 tsp | 12 ml | .5 oz | 15 g
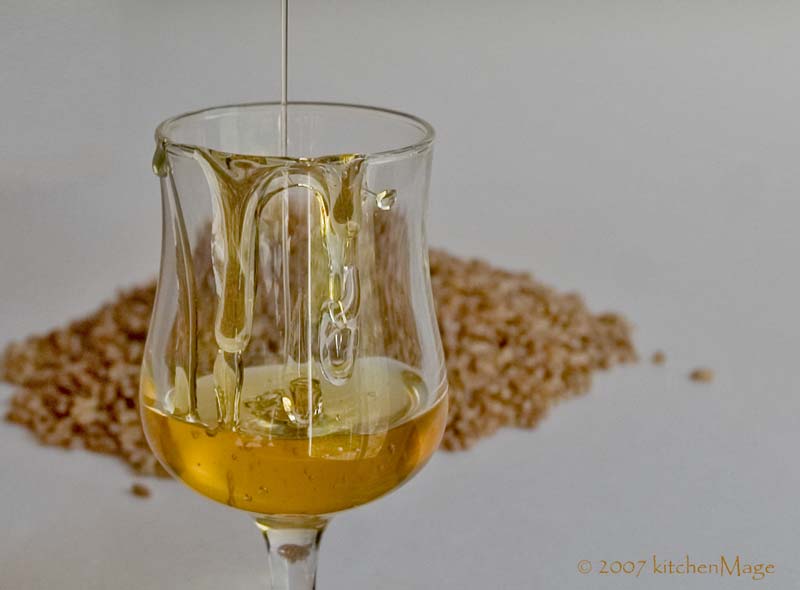
extra virgin olive oil 1/3 c | 80 ml | 2.3 oz | 65 g
fresh rosemary coarsely chopped 1/4 c | 60 ml | .4 oz | 10 g

Mix the dough
Remove the biga from the refrigerator and uncover it. It will be soft, airy, and a bit sticky. Scrape into a large bowl. Pour the water over the biga and stir it with a rubber spatula to soften it and break it into clumps. Stir in the flour, olive oil, rosemary and salt until a dough forms. [I added the yeast too, even though the copy editor did not.]

Knead the dough
By hand: Lightly flour the counter and scrape the dough out onto it. Knead the dough with steady strokes until it is silky, smooth, and elastic, about 13-15 minutes. Check that the dough is well-developed check that the deal was well developed by pulling off a golf ball sized piece and stretching it into an opaque windowpane. If the dough tears, knead for an additional two to three minutes and test again.

With mixer: With the dough hook, mix the dough on medium speed (four on a Kitchen-Aid mixer) until it is silky, smooth, and elastic, ten to twelve minutes. Check that the dough is well developed by doing a windowpane test, as described above. If it tears, knead for an additional two to three minutes and test again.

Bulk Fermentation
Place the dough in a clean bowl, cover and let rise until double in bulk.

Divide and shapes the loaves
Cover a baker's peel or rimless baking sheet with parchment paper and dust it with flour. Lightly dust the counter with flour. Uncover the dough and turn it out onto the counter. With the bench scraper or chef's knife, cut the dough into two equal pieces (19.7oz./560g each). Shape each piece into a log about 12in. long. Place the logs smooth side upon the parchment paper, at least 3in. apart, and cover them with plastic wrap.

Proof the loaves
Let the logs rise at room temperature (70 to 75°) until they spread and look puffy and light, nearly doubling in size, 45 minutes to one hour. Press your fingertip into the dough and your fingerprint will spring back slowly. [Even my oddly dense bread passed the 'puffy and light' and fingerprint tests.]

Prepare the oven
About 1 hour before baking, place a baking stone on the middle rack. Heat the oven to 400 degrees.

Bake the loaves
Slide the loaves, still on the parchment, onto the baking stone. Bake until the logs are dark caramel color, 30 to 40 minutes.

Cool and store the loaves
Slide the peel or rimless baking sheet under the parchment paper to remove the loaves from the oven. Slide them, still on the parchment, onto a wire rack. Cool the loaves briefly, then peel off the parchment paper. Let them cool completely on the rack, about one hour, before slicing. The olive oil in the dough will help to keep them moist. Store in a resealable plastic bag at room temperature for three to four days. [Or freeze.]
Recipe reprinted from Local Breads: Sourdough and Whole-Grain Recipes from Europe's Best Artisan Bakers by Daniel Leader (c) Copyright 2007 by W. W. Norton & Company, Inc. With permission of the publisher, W.W. Norton & Company, Inc.

Technorati: | | | | | | | |

Labels: , ,

Click here to continue reading the post and comments...

Sunday, July 08, 2007

Beth: Weights & Measures


There is a reason that, though injured, I wanted to write this article. You see, here at A Year in Bread HQ, we have weighty discussions and a fundamental disagreement that seems destined to remain eternally unresolved. Fortunately for our friendship, we each know that we alone are correct and we are happy to let the other two believe what they want to believe. So we continue to be good friends even across this divide.

Fortunately for you, however, I get to give you my side of the argument first and with any luck, educate you on something that has been weighing heavily on my mind lately before Susan and Kevin arrive to tell you what they believe (which is wrong, remember, but we can humor them — they are so much easier to live with when they think they are right).

What is the great argument here? Only the one true weigh, I mean way to bread happiness!

The question is: How much does a cup of flour weigh? The answers:
· Beth 4.5 ounces (126gr)
· Kevin 5.2 ounces (145gr)
· Susan 5 ounces (140gr)
How is it possible that three experienced, passionate, and sometimes downright geeky bakers can fail to agree on such a basic number? More importantly, what does that mean for people who just want to reliably make good bread?

Sadly, I have no simple answers. The weight of a cup of flour depends on many variables: the exact type of flour, whether it is sifted (and when), how the flour gets from container to measuring cup (scooped or spooned), and (my favorite) the weather.

What I can offer you is a collection of our thoughts on how we deal with the inexactness of measuring flour in real life (and a few related matters) with the hope that you will find your own answer for how much your cup of flour weighs.

Kevin
"A pint is a pound the whole world 'round." This refers to the fact that a pint of water (or beer) weighs one pound. This means that one ounce of liquid also weighs one ounce and it's the only case where converting from weight to volume or vice versus is painless.

Did you know that a level tablespoon of table salt weighs more than a level tablespoon of kosher salt, and that a tablespoon of sea salt has yet another weight? These issues matter tremendously when working at commercial quantities and when scaling from a relatively small amount of something to a much bigger amount. That's why professional cooks (and bakers) prefer to use weight to measure things.

I prefer to use volume measurements when baking bread — cups, quarts, tablespoons, and so on. The reason for this preference is convenience and accuracy. I have a decent kitchen scale, but its accuracy is imprecise when measuring units below 1 ounce. So although my scale tells me that a tablespoon of yeast weighs 3/8 of an ounce it might actually weigh 5/16ths. However, a tablespoon is always a tablespoon and is always 15 milliliters. At the quantities a home baker works at that's close enough -- even when measuring salt.

The hardest measure, and least precise, is flour. Flour is hydrophilic — it absorbs water. In a precise formula where water is a key element, such as bread, it isn't simply the weight of the flour that matters, it's the weight of the flour in relation to water that is critical. If the flour contains more water you should add less and if it contains less water you should add more.

Creepy Crawlies
Nearly any flour or grain (oats, etc.) will have some kind of insect eggs in it. Even if you can't store your flours in the freezer, just putting them in there for 24 hours will kill any future creepy crawlies.

As a home baker this is getting far too complicated. What matters is the proportion of water to flour, and you can learn to feel and taste and smell that. And once you learn to do so, then the precise measurements become less important. Feel your dough, taste it, and smell it at every step.

Susan
Although I love my scale, which is great for weighing out dough when shaping loaves and rolls, when I make bread I usually use cups & measuring spoons because the amount of flour is almost never the same, so I don't need the precision of weights. What I do is always use the same amount of water and yeast, then add more or less flour to make the dough feel right.

That said, I've been converting all my recipes to weight, because when I start baking on a large scale for the wholesale bread bakery we're slowly building here on the farm, I will have to weigh all of my ingredients.

I tend to make the same recipes over and over so I can get a good feel for what "right" is. I've been using the same brand of flour for over 10 years so I'm familiar with it.

I buy 50-pound bags of Heartland Mill Organic Unbleached All-Purpose Flour and Heartland Mill Organic Strong Bread Flour (High Gluten). During the summer, if I have room I store the flour in a chest freezer; in the winter our pantry literally turns into a walk-in refrigerator so everything is fine in there.

I buy organic whole grain flours (white whole wheat, whole wheat, rye, etc.) in smaller amounts because they go rancid faster. These are best kept in the freezer if possible to keep them fresher.

I store my flour in the original 50-pound bags which I store in large plastic tubs. I fill 2-gallon size commercial plastic tubs with all-purpose and bread flour from the big bags. I just scoop the flour into the tubs with a 2-cup s/s measure. When I'm baking, I take a s/s measuring cup and scoop up enough flour so that the cup overfills in one scoop. Then I scrape off the extra flour with the lid of the tub.

Beth
For the longest time I only measured things by volume, using my long practiced kitchenMage sense (sort of like Spidey sense but without the precipitating radiation) to tweak doughs that looked a bit off somehow. One day, after measuring 7 cups of flour for my usual batch of baguettes again, I decided to give in and spend the 50 bucks for a shiny metal box that would magically tell me the correct amount of flour each and every time.

As they say in Minnesota, "Ya sure, you betcha."

I am not saying I stopped weighing things, actually I use the scale all the time. Weighing ingredients, especially flour, is convenient and, once you figure out the correct amounts for a recipe once, reasonably reliable. But you need to figure out what the person who wrote each recipe meant when they said "1 cup" because, as you can see with the three of us, it's probably not what you mean when you say 1 cup.

When I have to measure flour by volume, I shake the plastic container that I store it in, scoop a measuring cup full and level it with the lid — pretty much like Susan. But I seldom measure that way. I usually weigh flour, figuring 4.5 ounces per cup) and leave out about a cup when I am mixing the dough. That flour, and more if needed, gets added once the dough has been mixed a bit and I have a feel for what it needs. The actual amount of flour I use (by weight) gets written in the margin of the cookbook so that after I have made a recipe a few times I know how much flour I need to use.

Usually after I have done this with a few recipes in a given book, I can generalize the weight to the rest of the book. When I can't, it makes me wonder what sort of committee wrote the cookbook — I can deal with high variance from one person to the next but not from one recipe to another in the same darned book!

What does this all mean for you? Well, a couple of things.

First, if you bake something and it doesn't come out quite right — heck, even if it is a total failure — don't blame yourself. Measuring a cup of flour is dirt simple stuff, yet the experts can't even agree amongst themselves. Even beyond that, all books have typos, the rigor of recipe testing varies from book to book, and, as anyone who made meringue on a rainy day will tell you, even environmental factors matter.

More importantly, you need to find your own path through this uncertainty. Susan's approach is a solid one: a cup of water weighs the same amount almost everywhere (I just know someone from Denver will be here to say it's different there). My approach of determining what a given author means in their cookbook will help you a lot as you bake using a variety of recipes. That last bit of advice from Kevin is perhaps the most useful: feel your dough. Once you know what a stiff dough feels like compared to a soft one, you will gain confidence in your baking that goes far beyond certainty as to the weight of a cup of flour.

But I am still right: a cup of flour weighs 4.5 ounces and don't let those heretics tell you otherwise.

Further reading: Weighting to measure

Technorati: | | | | | |

Labels: , , , ,

Click here to continue reading the post and comments...