banner

Thursday, May 31, 2007

Beth: Potato Bread

potato bread sandwich


When theKid was a young'un, I faced a challenge that I am sure is common to parental units across the country: white bread lust.

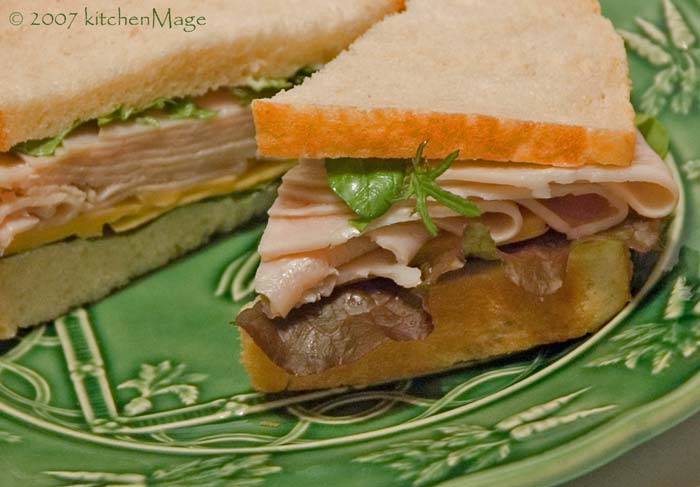
For reasons perhaps best explained by marketing, a lot of kids — even those who usually make sane food choices—seem to prefer bland, white bread. Sandwiches, toast, pretty much anything has to be white bread, but especially sandwiches. And kids eat lots of sandwiches. (hmmm, kids, sandwiches, Kevin, sandwiches... interesting....) Not very healthy and awfully boring. The white bread — not Kevin!

potato bread array

Then there was the cost of a decent loaf of white bread, which was simply exorbitant. Yet, even as a single mother on a tight budget, the affordable white bread in the shiny primary-color dotted bag was just too awful to contemplate. (The only thing I ever Wondered was who was buying that stuff!)

Whole Wheat Potato Bread

Potatoes have many positive effects on bread: yeast loves it, bread is softer and stays fresh longer, and bread dough with potatoes does not have to be mixed as long as bread without potatoes—amazing but apparently true! One of the more useful effects however, is an increased tolerance for whole wheat flour in the dough.

I used two cups of white whole wheat in one of my experiments and, with a few minor adjustments, I think this recipe would do nicely for anyone who wants a whole wheat take on this bread. As with all of bread baking, pay attention to the feel of the dough and adjust the ingredients where they seem to need it. Here is what you need to do differently, and why:

New first step: Mix the water, white whole wheat flour and yeast, cover and let it sit for ten minutes. This insures that the heavier whole wheat flour is totally hydrated before you start mixing the rest of the dough.

The white whole wheat flour absorbs more water, so add a little. I'd suggest a quarter of a cup. You may need to add a bit more when you are adding the rest of the flour, if it seems too dry to absorb all of it.

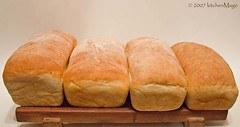
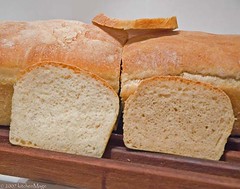
Let the bread proof until it is actually doubled in bulk. As you can see from the photo of the side by side white and white whole wheat loaves, I underproofed mine a bit. (I was nervous about it falling and it looked done. Oh well, live and learn.)

You can probably substitute more white whole wheat for white, although at some point you might need to add a little more yeast or a tablespoon of gluten if you have it around. The potatoes make this dough pretty forgiving.

Having sandwich bread that I was willing to eat, let alone feed theKid, meant making it myself. Fortunately, I knew how to do this, although, since I'd rather have my sandwich on a roll, standard loaves weren't in heavy rotation before then. Another saving grace was that theKid was not old enough to have kids at school telling her that homemade bread was, like homemade clothes, 'uncool.' Lacking a freezer to store a second loaf meant that I usually had to bake more than once a week, usually with the help of a toddler standing on a five gallon bucket of flour. Good times.

I started sneaking in bits of leftover cooked cereal, mashed potatoes, rice, and other things that seemed to have a complementary flavor and texture. This was surprisingly effective and had the bonus of helping me cut down on wasted food, which mattered a lot on my very tight budget.

sliced potato bread


Potato bread—soft, almost billowy, yet chewy enough to have some substance—was one of my favorites. Fresh herbs add a lovely depth to the flavor; rosemary and thyme are particularly good. This also makes wonderful dinner rolls; I like them with soup because they hold together well when dipping.

These days, I only bake bread for theKid when she makes the trek from theCity to evenTinierTown and it's been a long time since I had to sneak anything into her bread. I still love potato bread, though, and since I can never seem to make the right amount of mashed potatoes it's something I can make fairly regularly.

kitchenMage's Potato Bread
water | 2 cups | 475 ml | 16 ounces | 450 grams
bread flour | 5 1/2 cups | 1070 ml | 20 1/4 ounces | 570 grams
instant yeast | 2 teaspoons | 12 ml | 1/4 ounce | 7 grams
mashed potatoes | 1 1/4 cup | 350 ml | 8 ounces | 225 grams
butter | 2 tablespoons | 30 ml | 1 ounce | 28 grams
all purpose flour | 1 cup | 235 ml | 4 1/2 ounces | 125 grams
salt | 1 tablespoon | 15 ml | 1/2 ounces | 15 grams
Notes:
I based this recipe on mashed boiled potatoes with nothing added and used the water from the potatoes in the bread. If you want to do this, measure the water and raw potatoes then cook. When the potatoes are done, do not drain them, just mash them in the water. Then measure the mixture again and if it's not quite the same, add water until it is.

If you are using leftover mashed potato, you will probably need to add a little extra flour to make up for additions to the potatoes, such as milk or butter. You will have to judge this when you are making it.

In mixing bowl, combine water, potatoes, yeast and flour and mix until well combined. Add the butter and mix until it is integrated into dough. The dough will still be very soft. Cover and let rest on the counter for 20 minutes.

Add the salt to the dough when you do the next step.

If you are using a mixer: Use the dough hook and mix it on medium while you sprinkle in the all-purpose flour a tablespoonful at a time. When the absorption of the flour starts to slow down, turn it out on a well-floured counter and knead until the dough is smooth and supple, but no longer tacky.

potato bread

If you are making the dough by hand: Spread the cup of all-purpose flour on the counter and knead for 4-5 minutes, adding more flour if needed. Knead until the dough is, as Kevin would say, smooth as a baby's...um, never mind, we got labeled as an adult site by one of those net-filtering software things because I said "bread p**n" once. Geez.

Roll the dough in flour, put it in a clean bowl, cover and let rise until doubled in bulk (about an hour).

Turn the dough out on a lightly floured counter, divide in half and shape into loaves. Grease two loaf pans. Put the shaped loaves in the pans and let rise until doubled in bulk (about an hour).

Preheat oven to 375°f / 175°c. Bake bread for 35 minutes or until golden brown (~195°f / 90°c internal temperature). Turn out of pans onto cooling rack for at least an hour.

truth in blogging


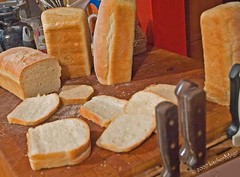
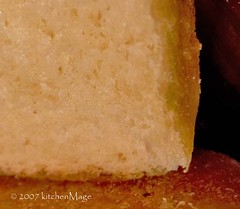
This last picture? Just a bit of truth in blogging. Just in case we put up a convincing front that it is all we just make a recipe up in fifteen minutes and bake one loaf and it is perfect and our kitchens are always clean. As if!


Technorati: | | | | | <| | | |

Labels: , , ,

Click here to continue reading the post and comments...

Thursday, May 24, 2007

Kevin: Basic White Bread


I've said before, and I'll repeat it here, I enjoy baking bread more than I enjoy eating it. I like bread, and I certainly appreciate good bread, I'm just not a huge bread eater — with one caveat. I'm a sandwich fanatic. In fact, Beth has occasionally referred to me as Pig Sandwich Boy in reference to my dual loves of pork and sandwiches.

There's a Web site named I Love Sandwiches that once had a poll on it asking what's the most amount of time you've ever devoted to making a sandwich? My answer was 36 hours. It took that long because it began with making a poolish from my sourdough starter and proceeded in due course to making the bread, allowing it to rise twice, baking it, and then letting it cool enough to slice for sandwiches. My friends, the true mark of a sandwich lover is when they begin by making the bread for the sandwich.

"There is an art to the business of making sandwiches which is given to few ever to find the time to explore in depth. It is simple task but the opportunities for satisfaction are many and profound…" ~ Douglas Adams, Mostly Harmless

Reputedly the sandwich is named for John Montague, the Fourth Earl of Sandwich. The story goes that he was gambling and rather than take a break from the table to eat he told his servant to bring him a piece of meat between two slices of bread so he could eat with one hand and play cards with the other.

Whether the tale is apocryphal or not, the name does seem to come from him. And I think it holds a key to what truly defines a sandwich: A sandwich is some filling, enclosed in bread, that can be eaten by hand. By this definition a so-called open-faced sandwich is generally not a sandwich because it requires at least a fork to eat. A pizza is not a sandwich, but in terms of utility a calzone is a sandwich just as an empanada or wrap or hamburger is a sandwich.

But whatever the definition, the classic sandwich remains a filling or fillings between two slices of bread. Whether it's a Rueben, a grilled cheese, a ham panini, a cubano, a mufaletta, a Bánh mi a hoagie, a Philly steak and cheese, PB&J, or a BLT they all share a common form and they're all delicious — especially when made with top quality bread.

Click to enlarge

Although sandwiches have a place in every season, they are particularly suited to summer. They're as heavy or light as the maker desires, they're tremendously portable, and they're quick to prepare (at least they are if you've already baked the bread), and almost everyone has a favorite sandwich. That's why when we were planning A Year in Bread we decided to start off the summer with that most basic of sandwich ingredients, white loaf bread.

My favorite recipe is from Beard on Bread by James Beard. It's made with sour cream which adds some tang to the loaf, but mostly produces an open crumb that makes the best damned grilled cheese sandwich you've ever eaten (recipe below). This bread recipe doesn't produce the huge lofty loaves that Susan's Farmhouse White does, but that's an issue of dough quantity and not how the bread rises. Besides, I find the smaller slices such loaves produce easier to make one-handed sandwiches with — which allows me to eat a sandwich with one hand while making my next loaf of bread, or make manageable sandwiches for kids.

Sour Cream Bread
Adapted from a recipe by James Beard.

ingredient US volume | Metric Volume | US weight | Metric
unbleached bread flour 4 1/2 - 5 c | 1050 - 1200 ml | 23 - 26 oz | 650 - 725 g
instant yeast 2 tsp | 10 ml | 1/4 oz | 4 g
granulated sugar 3 tbsp | 45 ml | 2 oz | 32 g
baking soda 1/4 tsp | 1 ml | --| --
salt 2 tsp | 10 ml | 1/2 oz | 8 g
warm water 1/4 c | 60 ml | 2 oz | 56 g
sour cream, at room temperature 2 c | 480 ml | 16 oz | 450 g

Click to enlarge

Thoroughly combine 4 1/2 cups (650 g) of the flour with the yeast, sugar, baking soda, and salt in a bowl. Mix in the sour cream and water. You should have a wet, sticky dough, but you made need to add a bit more flour to make it manageable. Scrape out onto a lightly floured board.

Using a baker's scraper or a spackling knife, lift the flour and the dough, and fold the dough over. Turn it clockwise slightly and repeat the lifting and folding process until the dough is less sticky and can be worked with your hands. Add only enough flour to prevent sticking. (This entire kneading should take about 10 minutes, possibly longer if you are inexperienced). Shape the dough into a ball, place in a buttered bowl, and turn to coat it with the butter. Cover with plastic and let sit in a warm spot to double in bulk. (Note: The mixing and kneading can be done in the bowl of a stand mixer.)

Punch the dough down. Turn onto a lightly floured board and knead for a minute, then divide into two equal pieces. Butter two 9 x 5 x 3-inch loaf tins. Shape the dough into loaves and fit into the tins. Cover loosely and let rise again until doubled. Bake in a preheated 375F (190C) oven for 30 to 35 minutes, or until the loaves sound hollow when tapped on top and bottom. Cool thoroughly before slicing.
It may, perhaps, seem foolish for me to post a recipe for a grilled cheese sandwich — after all you can’t get much simpler. And yet, a truly great grilled cheese is one of the best sandwiches on earth and they don't happen by accident. They are made deliberately with care given not only to the choice of ingredients, but to their proportion and the cooking method.

The Perfect Grilled Cheese

Click to enlarge

Take a loaf of bread with a crumb that's almost cake-like in appearance. In the recipe above the sour cream produces the open pores while the bread flour gives it the firmness it needs. Cut two 3/8 inch slices. I know, I know. Too much precision. But if the bread is too thin the cheese will melt too quickly and if it's too thick the cheese won’t melt quickly enough.

Spread each slice with a light coating of unsalted butter at room temperature.

Place one slice of bread, butter-side down in a cold skillet. Cast iron is best because it heats slowly.

Cut as much sharp cheddar cheese (I highly recommend Grafton Village 1-year- old cheddar but almost any sharp artisanal cheddar will do) into enough 1/8 inch slices to cover the bread. Again, this seems overly precise, but the goal is that the cheese is perfectly melted at exactly the moment the bread is properly browned.

Place the second slice of bread on the cheese and turn the heat to low medium. The bread should start browning in about 6 minutes and should be perfectly browned in 8 - 9 minutes. The cheese will be tacky enough to hold the bread together, but not truly melted. Flip the sandwich and cook until the other side is browned, about 4 minutes, and the cheese is completely melted.

With the right bread and cheese, the bread will actually absorb some of the cheese — a bit may even soak all the way through the bread to contribute to the browning on the second side.
I like to cut the sandwich into two triangles and then eat it with a few pickled peppers and a mug of hard cider. This, my friends, is absolute bliss.

For a collection of sandwich photos, click here.

Technorati: | | | | | | | | |

Labels: , , , ,

Click here to continue reading the post and comments...

Thursday, May 17, 2007

Coming Soon: White Bread -- The Series


We're doing white bread and Susan is leading the charge. But she has sheep, beans, and tomatoes distracting her -- not to mention the bakery she's trying to launch -- so we'll get her post online as soon as we can.
Click here to continue reading the post and comments...

Wednesday, May 09, 2007

Baking Better Bread


Susan: Do some reading. Just don't overdo it. Pick one bread book and read it from cover to cover. If you like it and it makes sense to you, read it again. Then try a recipe. If you like the result (or if it came out terrible but you know it has potential), make it again. And again and again and again. It is better to make one bread twenty times than to make twenty breads one time.

Beth: Don't be afraid to experiment. Once you've learned to bake one kind, using the same recipe, reliably. Then try a recipe that has a significant difference from the first — like using a starter or additional ingredients. You can compare the results and learn how the changes in recipe/method change the resulting bread.

Kevin: Get several books. One author's way teaching may make more sense to you than another's — even though both authors know what they're talking about.

Beth: Try long cold fermentations. Almost any bread is improved by a long, cold bulk ferment. Sweet or enriched breads don't benefit as much, but still some. You may want to reduce the yeast (by 25-50%, maybe even a bit more) so be prepared to experiment.

Kevin: Parchment paper is more reliable than corn meal, flour, or both for releasing bread from the peel.

Susan: Start with the very best ingredients. When you are creating something with only four basic ingredients (flour, water, salt, yeast), the quality of those ingredients is crucial.

Beth: It is easier to handle slack doughs when they are cold.

Kevin: Use a baking stone (sometimes called a pizza stone). Stones are capable of absorbing a great deal of thermal energy and then giving it up slowly which means the bread cooks at a more consistent temperature. And give the oven and stone plenty of time to preheat — at least an hour.

Beth: If you want a rustic, open crumb with those marvelous large holes do not 'punch down the dough' after the first rise. Instead, turn it out on a floured surface and fold the dough into thirds, gently stretching when needed. You want to degas the bread as little as possible while still creating surface tension in the shaped loaf. A little practice will make it all fairly easy.

Beth: If dough springs back When you are shaping it, let it rest a few minutes to relax the gluten. You may need to repeat the stretch-rest cycle a few times to get the dough into the desired shape.

Susan: Use a sourdough starter or a sponge or a poolish or a lump of old dough. There are all different types of "starters." Some are made in a few hours, some in a few days, and some live in your fridge forever. Any kind of starter will vastly improve the crust, crumb, and flavor of your loaves.

Susan: Sprinkle in the flour and stir like crazy. When you are mixing up your dough, add only about a handful of flour at a time. Use your whole arm to stir, making wide sweeping motions. This will "whip" the dough and allow the gluten to develop.

Kevin: Never add all the flour in the beginning even if you're using a stand mixer. You can always add more flour if you need it.

Beth: Those thin plastic "cutting boards" that you can pick up in multi-packs for a few dollars are a baker's dream. I've been using mine as rolling surfaces lately. You can even stack them with dough on them for resting periods so you free up counter space. If you use them for rolling dough, remember the untextured side sticks less.

Susan: Give it a rest, then add the salt. This tip not only greatly improves nearly any type of bread, but it also allows you to decrease your kneading time (which improves the bread even more).

Beth: Pizza stones radiate heat that can be used to give rising bread a kickstart. Place a warm stone on the stove top with a rack on top of it, then set the dough on top of that to rise.

Kevin: The oven can be used to speed up the dough rise. In most ovens, the light will raise the temperature in the oven to around 75F (24C), which is perfect for raising bread.

Susan: Catch yourself a couche. A couche is a piece of heavy canvas that is dusted with flour and used to support freestanding loaves, such as rolls and baguettes, while they are proofing. The couche cradles the loaves, keeping them straight and preventing them from sticking together.

Susan: Make some steam. Steam slows crust formation, which allows for the best possible oven "spring." It also gelatinizes the starch on the surface of the bread so that it develops a thin, glossy, beautifully brown crust.

Note: You can read more detailed versions of Susan's tips at Farmgirl Fare.

Technorati: | | | | | |

Labels:

Click here to continue reading the post and comments...

Metaphor Gone Mad