banner

Wednesday, June 20, 2007

Beth: Summer Breads - Pesto Rolls

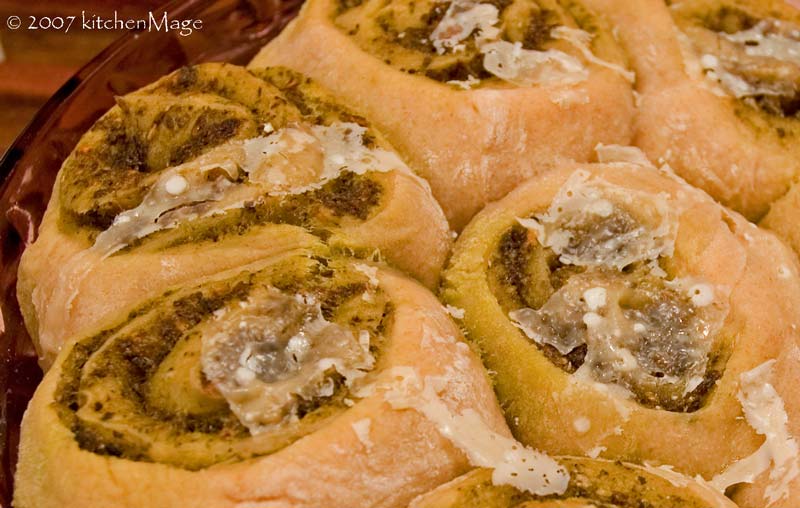
Beth's pesto rolls


Around my place, summer means casual food that can be grabbed on the run, or taken to impromptu parties and late night bonfires. Like tomorrow night's solstice bonfire, or tonight's impromptu birthday celebration. (Not that the birthday is impromptu, but the celebration is.)

Summer is also when my herbMage aspect emerges in full bloom to fall upon the bounty of seasonal herbs, especially basil. Don't get me wrong, I love most herbs but I have a particular soft spot for basil. I am guessing that many of you share this particular fondness; basil seems to always have plenty of dates for summer parties.

These rolls are one of my favorite summer breads. Easy to make and infinitely variable, they don't need to be sliced or buttered, making them perfect for those casual summer picnics and parties where cutlery is superfluous.

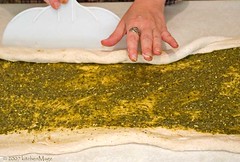
shaping pesto rolls

The dough is relatively simple, although it does use a starter, and the extra few minutes it takes to fill, roll, and slice into rolls is well worth it for the payoff. I usually make my first batch of these babies in early June and keep making them until the freeze kills the basil…or later if I managed to freeze pesto.

kitchenMage's Twirled Pesto Rolls

Ingredient | Volume US | Volume Metric | Weight US | Weight Metric
Starter:
water| 1 cup | 235 ml | 8 ounces | 450 grams
bread flour| 1 cup | 235 ml | 4 1/2 ounces | 125 grams
whole wheat flour| 1/2 cup | 112 ml | 2 1/4 ounces | 62 grams
instant yeast| 1/4 teaspoon | 1-2 ml | 1/4 ounce | 2 grams
Dough:
water| 1 3/4 cups | 350 ml | 14 ounces | 392 grams
bread flour| 5 cups | 1175 ml | 22 1/2 ounces | 630 grams
instant yeast| 1 1/4 teaspoons | 8 ml | <3/8 ounce | 10 grams
olive oil| 3 tablespoons | 45 ml | 1 1/2 ounces | 42 grams
salt| scant tablespoon | 15 ml | 1/2 ounce | 15 grams

pesto for filling| 1 cup | 235 ml | 8 1/4 ounces | 232 grams
parmesan cheese (optional)

Notes:
If you don't have a favorite pesto recipe, I'd recommend Susan's pesto as a starting place.
I posted a flickr set with a number of photos if you want a more visual how-to than what follows. I did not link them here because they seem to work better taken in order. So click already!

Mixing the starter
In mixing bowl, combine starter ingredients and mix until well combined. Cover and let rest on the counter for about two hours until it is very bubbly. (You can shorten this to ~20 minutes or wait as long as 4 - 5 hours. You can also refrigerate the starter for 24 - 48 hours after it bubbles.)

Mixing the dough
Add water, 4 cups of bread flour and yeast to the starter and mix well. Add the oil and mix until it is integrated. Sprinkle in the additional cup of flour as you go — you may not need all of it, you may need a little more. (As we all know, my flour lives in a fog valley and yours does not, so they weigh differently. They would weigh differently in any case, but that is my excuse.)

When the absorption of the flour starts to slow down, turn it out on a well-floured counter, cover with a towel and let rest for 20 minutes.

Sprinkle the salt on the dough and knead until firm yet supple (like a Chippendale's dancer's butt). This is basically a baguette dough and it feels like it – smooth and neither tacky or dry. When it is done it feels good to knead and I think, "this is what bread dough should feel like!"

Roll the dough in flour and place it in a clean bowl. Cover the dough and let rise until doubled in bulk (about an hour).

When the dough has doubled, turn it out on a lightly floured counter and flatten into a rectangle. You are going to roll this out into a 12 x 24 rectangle and it will take a few cycles of rolling and resting (that Chippendale's reference just hangs there…begging to be used) to accomplish this. Roll the dough out until it starts resisting and springing back, then let it rest for 5 minutes and repeat.

Other fillings

I love these rolls filled with pesto but that is not the only thing you can use. Almost any very thick mixture will work for filling so feel free to experiment. If you think that bread would taste good dipped in it, then it will probably be a good filling. You can even include bacon if you must have that touch of pig.

Many sauces can be made the right consistency for filling by reducing the liquid (often olive oil) used to make it. I have been wanting to make a paste version of my favorite roasted red pepper sauce (mostly garlic, roasted red peppers and rosemary) but seldom remember it when I am in a store that has the peppers – let me know how it is if you try it.

I have also made these with deconstructed pesto: brush the dough with olive oil, scatter liberally with torn fresh basil, pine nuts and parmesan cheese, then roll, cut and bake as described.

Place the dough on the counter so that the long side is parallel to the counter edge. Spread pesto on the rectangle of dough, leaving an inch uncovered the long edge that is further away from you. Brush the exposed edge with water. Roll up the dough starting on the side closest to the counter edge and rolling away from you. The water brushed edge will be the last part to be rolled up, pinch the edge to seal. You should now have a 2 foot long cylinder of dough. (don't you dare bring up the Chippendale's now!)

Cut the rolls into 1 1/2" - 2" sections (my three fingers are about 1 15/8 inches wide so that's how tall my rolls are) and place in a lightly buttered baking pan. When I last made these, I had 15 rolls, which fit into two glass pie pans.

Cover and let rise until doubled in bulk, about an hour. Bake in a preheated 400°F/205°C. Bake bread for 25 minutes or until golden brown (~195°F/90°C internal temperature). Cool rolls in pans for 15 minutes and then place on rack to finish cooling.

Optional: If you want a bit of melted parmesan on top of the rolls, use a vegetable peeler to shave off little pieces onto the hot baked rolls and return them to the oven for a couple of minutes to melt.

Variation: This recipe can also be made into two loaves of bread. To do so, divide the dough in half before shaping and then roll into two rectangles (~9 x 14) before filling and rolling. Don’t cut the loaves into rolls and place the loaves on a parchment lined baking sheet to proof and bake.

Sources and inspiration: The bread recipe is based on Peter Reinhart's polish baguette (BreadBaker's Apprentice) and while I had the idea independently, I must note that Jerry Traunfeld's Herbfarm Cookbook has a rolled pesto loaf in it. This last bit makes me happy that I could come up with the same thing as Mr Traunfeld because as Daniel Leader is to Susan, Jerry Traunfeld is to me. sigh

Technorati: | | | | | | | | |

Labels: , , , , ,

Click here to continue reading the post and comments...

Wednesday, June 13, 2007

Kevin: Summer Breads - Buns


"Pig sandwich boy." This is what my co-blogger and supposed friend Beth calls me. Does this sound like a term of endearment? A sweet and touching reference to my fondness for sandwiches and pork? Or does it sound more like opprobrium? A sly snideness hiding behind a mask of bonhomie. I think she's dissing me and isn't really one of my homies, bon or otherwise. Perhaps she has simply mistaken her classics and considers me a Pygmalian, but I think not.

Be that as it may, here at AYIB central (meaning a conference call using my phone service) we've decided to do another selection of summer breads, but not sandwich breads, per se. Instead we're going to offer three different breads suitable for summer picnics, pool parties, watching fireworks, and plain old lazy-Sunday grilling. I got the nod to go first and thought I'd offer a bun recipe. Specifically a recipe I developed last summer for pulled pork barbeque. (Ok, so maybe Beth has a point.)

In this area of the South pulled pork is usually served on soft white hamburger buns. They're a better platform than the white sandwich bread used in some places, but contribute almost nothing to the final sandwich. I'd decided to make barbeque for my father's birthday and decided if I was going to devote 8 - 9 hours smoking a pork butt to perfection then I wanted something better than an ordinary hamburger bun. I wanted a bun that made it's own contribution to the meal and after giving it some thought I decided that if pork is good on the bun, it'd be good in the bun. So I came up with these Bacon Buns. (Alright, so Beth definitely has a point.)

The recipe incorporates some whole-wheat flour for both flavor and texture — but not a lot. The bun should be light and airy. Along those same lines, slow rising and minimal yeast produce deeper and richer flavors and I have bias toward such flavor. But these characteristics also produce a tougher bread because the gluten is more developed. So in keeping with my "light and airy" goal I elected to do a quick single rise.

Bacon Buns
Makes 10 - 12 buns.

ingredients US volume | Metric volume | US weight | Metric weight
milk 1 c | 236 ml | 8 oz | 225 g
water 1/2 c | 118 ml | 4 oz | 112.5 g
bacon fat 1/4 c | 56 ml | 2 oz | 56 g
whole-wheat flour 1 c | 236 ml | 5 1/8 oz | 146 g
all-purpose flour 3 1/2 c | 825 ml | 18 oz | 510 g
instant yeast 1 1/2 tsp | 7.5 ml | — | —
sugar 2 tbsp | 30 ml | 1 1/4 oz | 32 g
salt 1/2 tsp | 2.5 ml | — | —
egg 1 large

Heat the milk, bacon fat, and water in a small saucepan until about 110F.

Mix together 2 cups flour, yeast, and sugar in the bowl of a stand mixer using the paddle attachment. Mix in milk mixture, followed by the egg.

Add remaining flour 1/2 cup at a time — switching to the dough hook after adding a cup and a half of flour. Knead for 8 minutes then turn out on a floured board and knead 2 or 3 minutes longer if required. Shape dough into a roll and allow to rest for about 10 minutes.

Slideshow: Shaping Buns

Divide dough into 10 equal pieces. Form each piece into a round shape and place on a parchment lined baking sheet. Click on the slideshow to the left to see the details of shaping the buns.

Spritz buns with a light coating of oil and cover with plastic wrap and allow to rise until slightly more than doubled in bulk (it took an hour and a half for this batch).

While the buns are rising, heat the oven to 400F and position a rack in the middle of the oven.

Bake for 8 minutes, then rotate baking sheet 180 degrees. Bake another 2 to 4 minutes until golden brown.

Technorati: | | | | | | | | |

Labels: , , ,

Click here to continue reading the post and comments...
Thursday, June 07, 2007

Breads for Breakfast and Brunch

I've never been a breakfast person. Or, perhaps more accurately, I never been big on eating breakfast. A cup of coffee and a newspaper is all I want when I get up. But give me an hour or so for my belly and taste buds to wake up and I can match a lumberjack sausage for sausage, flapjack for flapjack, and biscuit for bagel. Consequently, I'm a huge fan of brunch.

Early summer is the perfect season for brunch, morning temperatures are perfect for sitting outside on the patio or by a pool eating strata, noshing on sausages, and drinking Mimosas or Bloody Mary's. The combination is hard to beat. But you've got to have some sort of bread, so we've come up with a trio of quick breads for that lazy summer morning with a few good friends.

Susan's Savory Cheese & Scallion Scones
Makes 8 large scones

Click to Enlarge

I came up with this recipe back in 1993 during a severe scone craving when there was no butter in the house. They're a snap to prepare and are really versatile. Serve them warm from the oven with dinner instead of rolls or bread--plain, buttered, or with cream cheese. Or split and toast in the toaster, spread with cream cheese and thinly sliced ham or turkey for a satisfying breakfast on the run, light lunch, or terrific after-school snack. They also freeze beautifully if you happen to have any left over (hint: the recipe can easily be doubled). Defrost at room temperature and heat at 375 degrees in an oven or toaster oven for about 5 to 8 minutes. If you're in a hurry, you can defrost them in the microwave before reheating.

Half & half will give you richer scones with a slightly nicer texture, but milk works quite well, is lower in fat and calories, and is usually always in the fridge. Either way, these are very moist and are healthier for you than traditional scones made with butter and/or heavy cream. You can also substitute Neufchatel cheese for the cream cheese, but I don't recommend using fat-free cream cheese. Fresh baking powder is essential. And as always, I urge you to seek out locally grown and organic ingredients whenever possible.
The optional egg glaze will give your scones a beautiful shine and dark golden color. Look for locally produced, farm fresh eggs at your farmer's market or natural foods store. You won't believe the difference compared to commercial eggs. The yolks are sometimes so dark they are a gorgeous deep orange, and the eggs actually taste like eggs! Enjoy.

2-1/2 to 3 cups all-purpose flour
1 Tablespoon + 2 teaspoons baking powder*
1 teaspoon salt
4 ounces feta cheese, crumbled (I use sheep/goat milk)
4 ounces cream cheese, softened in microwave 15-30 seconds (you want it very soft)
4 large scallions (green onions), green & white parts, chopped
1 cup half & half or whole milk
1 egg
Optional egg glaze:
Beat well with a fork:
1 egg & 2 Tablespoons milk

Heat oven to 400 degrees.

Combine 2-1/2 cups flour, baking powder, and salt in a large bowl.

Add cheeses & toss gently with a fork until combined.

Add scallions & toss gently with a fork until combined.

Beat half & half (or milk) with egg and gently fold into dry ingredients, mixing lightly until a soft dough forms. Add up to 1/2 cup additional flour if the dough is too sticky.

On a floured surface, gently pat dough into a circle approximately 1-inch thick. The key to tender scones is to handle the dough with a light touch and as little as possible. With a sharp knife (I use a large serrated knife dipped in flour) cut the circle into 8 wedges and place them on a greased or parchment-lined baking sheet. (I can't imagine life without my commercial half-size sheet pans.)

Brush tops and sides of scones with egg glaze if desired, and bake for 20-25 minutes, or until golden brown. Cool on a wire rack. Serve warm, or cool completely and refrigerate or freeze in an airtight container.

*Make sure it's fresh! I prefer Rumford brand, as it does not contain aluminum and always gives me excellent results.

kitchenMage's Quick and Flaky Biscuits
Makes 12 - 15 biscuits.

Click to Enlarge

Biscuits are a perennial favorite. You can eat a fresh biscuit about 30 minutes after you decide you want one. (I believe this is the landspeed record for homemade breadstuff.) Hot out of the oven, a biscuit is simply layers of delicate, steaming flaky near-pastry. Add a smear of butter and a dollop of jam and it could be dessert! Biscuits are also a perfect recipe for teaching small children to bake. They are that easy, plus, tiny child hands can be very gentle, which helps with the flakiness.

Ingredient | US volume | US weight | Metric
Flour | 2 1/4 cups | 10 1/8 ounces | 285 grams
Salt | 3/4 tsp | 1/8 ounce | 4-5 grams
Sugar | 1 tablespoon | 5/8 ounce | 18 grams
Baking powder | 4 teaspoons | 5/8 ounce | 19 grams
Butter, very cold | 1/3 cup | 2 5/8 ounces | 75 grams
Milk, very cold | 1 cup | 8 ounces | 225 gram

Preheat oven to 450°

Place flour, salt, sugar, baking powder and baking soda in food processor and pulse for a few seconds to combine.

Cut cold butter into small pieces and add to food processor. Pulse half a dozen times and check for the size of the butter pieces. Repeat if necessary until the butter is in pieces roughly the size of peas.

Put flour mixture in a mixing bowl and add the cold milk. Toss together gently until barely combined. I use the little white plastic tool in the picture to lift the dough from the side of the bowl and dump it on top of the rest of the dough.

As soon as the dough holds together, turn it out on a lightly floured counter. Gently "knead" the dough a few strokes until it is a mostly a cohesive ball.

Roll the dough into a rectangle 1/2 - 3/4 inch thick, depending on how tall you like your biscuits. Cut into 2 inch circles, you should get 12 - 15, and place on a parchment lined cookie sheet.

Bake at 450° for 8 - 10 minutes. Butter and eat while still warm.

Kevin: Butter Popovers
Makes six large popovers or 12 small.

Click to Enlarge

Actually, these are Rose Beranbaum's popovers, based on a recipe in The Bread Bible. These are the best popovers I've ever eaten, the butter adds richness and tones down the strong eggy flavor most popovers have. If you don't have a popover pan, use a muffin pan and be sure to only half-fill the cups.

1 c Wondra flour (must be Wondra)
1/2 tsp salt
1/2 tsp sugar
1 c whole milk — at room temperature
2 eggs — at room temperature
4 tbsp butter — melted

Heat oven to 425F 30 minutes in advance. Place one oven rack on the bottom level and the other on the second level (this avoids having the popover rising into the other rack).

In a large bowl, whisk together flour, salt, and sugar. Slowly add milk using an electric mixer on low. Add eggs one at a time, thoroughly mixing after each addition. Add two tablespoons of butter to batter. Transfer to pitcher for pouring.

Brush popover cups with butter then distribute remaining butter evenly among the cups.

Heat popover pan in oven for 3 minutes. Fill each cup halfway with batter.

Cook popovers on the second rack for 15 minutes then reduce heat to 350F and continue cooking 20 - 35 minutes until well puffed and brown. Do not open oven for at least the first 20 minutes. Six - 10 minutes before popovers are done, use a small, sharp knife to poke a slit in the top of each popover and allow steam to escape.

When done, remove popovers from the pan and cool on a rack.

Technorati: | | | | | | | | | |

Labels: , , , , , ,

Click here to continue reading the post and comments...