banner

Wednesday, April 25, 2007

Kevin: No-Knead Muffins


Of the three of us hosting this blog, I'm the artiste, while Beth and Susan are technicians. Alternatively, of the three of us Beth and Susan are the dedicated bakers, seeking perfection while I'm the gadfly with the attention span of, well, a gadfly. I prefer the first interpretation but suspect the second is far more accurate.

Nevertheless, one of our goals was to present different approaches to baking bread. My compatriots will make a recipe two or three or more times in a row, tweaking each iteration, until they've nailed it. You can learn a lot from them. Me? I'll make it once, take some notes about what I think worked and didn’t — notes that I often lose — and then not try it again for a year or more if ever. Yeah, gadfly is probably a more accurate description of my approach.

I've been making English muffins for many, many years and although I've produced some superior muffins, I've never produced something as good as what I want. In fact, I've never produced something close to what I want.

Like Beth, I wasn't tremendously impressed with the NY Times No-Knead Bread when I first tried it. It was certainly pretty, but the flavor was on the bland side. and it got stale rapidly. It wasn't suitable for sandwiches, too many huge holes, but given how quickly it became stale that wasn't really an option anyway. Besides, I didn't see that it saved me anything. Kneading only takes 10 minutes and if the long rest between mixing and baking seems like a good idea, then you should know that almost any bread can be refrigerated for 12 hours before baking without harm. In fact, 12 hours in the fridge usually helps the flavor.

Perfect English Muffins

When I was a kid my mother sometimes bought Bay's English Muffins. These gems weren't found with the rest of the breads — or other English Muffins — they were in the dairy compartment near the cheese, eggs, butter, and milk. Exactly were they belonged. I've eaten hundreds, perhaps thousands, of English muffins over the years, and Bay's remains the ideal.

An English muffin is cooked on a griddle — fried, in effect. But it should never taste fried, it should taste baked. And yet, baking wouldn't work. To achieve the proper crust it must be exposed to direct heat.

Split an English muffin open and ideally you should see a moonscape of large and small craters, these craters are perfect for collecting puddles of sweet butter and capturing snags of marmalade.

Bite into one and, unlike most bread — or English muffins for that matter — and you find you need your incisors to tear off a piece like picking up a steak and tearing off a bite. And like steak, you have to chew it.

A truly good English muffin has a noticeably sour note to it. A flavor that blends with something like orange marmalade and highlights a topping such as strawberry jam. Butter is its heart-mate.

Nevertheless, when I sliced into and ate my first piece of this bread I was immediately reminded of my favorite English muffins. It was immediately obvious that the failure in all the muffin recipes I'd tried was that they didn't use a slack dough. A wet, loose dough produces the chewy character and gorgeous nooks and crannies that collect butter and marmalade that, to my mind, is the height of English Muffindom. I don’t know why it took me so long to make that connection. But then, we gadflies aren't known for our intellectual attributes.

I immediately decided I needed to try the recipe as a muffin.

Step one was to get some muffin rings. None of the muffins I'd made in the past needed rings. They were sturdy enough to shape and then rise on their own, but using the no-knead recipe would produce pancakes, not muffins — unless the dough was confined. I ordered some muffin rings and they disappeared into a cabinet until this past Sunday.

On Sunday I mixed the dough according to the recipe except that I rounded off the water to 1 1/2 cups (what's with this 5/8 cup nonsense?) and then followed Beth's suggestion and covered the bowl with plastic and refrigerated it for about 15 hours.

On Monday I pulled it from the fridge and let it warm for an hour and a half. Bad move. Although the dough was still cold, it was too warm for easy shaping. Nevertheless, I pressed on and dusted my aluminum peel with a heavy coating of corn meal, arranged nine rings on it. I dusted my baker's mat heavily with flour and rolled the dough into a cylinder about 12 inches long. Actually, not so much a cylinder as a puffy, sort of rectangular pancake 12 inches long — this stuff is as hard to control as a two-year-old.

No Fear

I didn't screw up my first batch of muffins on purpose. But I did make them knowing I'd screw up. I even suspected some of the ways I'd screw up. But this effort was an experiment. I wanted to learn and that meant I needed to know what could go wrong.

I believed Beth when she said shaping the dough cold was a good idea, but how cold? So I let it warm up some and then tried it. Bad idea. I learned to do it straight from the fridge.

With most breads you let them double in bulk before cooking, but I didn't know how that translated to a slack dough in a ring. So for my first batch I tried several degrees of filling and rising. The conventional wisdom proved correct — fill each ring half way (more or less) and cook when the rings are filled with risen dough.

I also learned that this dough is probably too wet for this purpose, I'll use a bit more flour on my next effort and knead the additional flour by had to understand the texture I want.

I baked my first brick 40 years ago, I'm still learning. Never be afraid of learning.

I divided the cylinder-rectangular-pancake in half and cut that up to form the patties. Not knowing how much rise to expect or plan for I varied the size of the patties I placed in each ring. I also ended up stealing some dough from the second half to fill all the rings. I let the dough rise until the rings were filled and pressing against the plastic wrap I'd covered them with.

I should have anticipated the next problem. But didn't. The muffins stuck to the plastic. Unsticking them was a delicate operation, but I accomplished it and they went onto a griddle lightly brushed with lard. Sadly, they didn’t slide neatly off the foil. Despite the generous layer of corn meal they stuck to the peel too, so I had to use a spatula tomove them from peel to griddle.

Another problem. Although I was careful to use very little fat, I still used too much and the muffins fried. That didn't hurt the flavor, but did hurt the texture of the crust. I made a note to use a paper towel to wipe the griddle after oiling it for the second batch.

Last error. I should have greased the insides of the muffin rings. Actually, it did cross my mind, but for some reason (I'm not sure why) I didn't. I had to run a knife around the inside of the rings to free the muffins, which destroyed their edges.

Click to enlarge

So, given all these problems, what was the result? A decent muffin. Not great, the crust was too crisp and they were too thin, but the holes I'd desired for so many years were there as was the chewy texture. The flavor? Not so great.

I'd wrapped the unused dough in plastic and put it back in the refrigerator. So the next day I unwrapped it and made a second batch and allowed for my earlier problems. So I:

  • didn't allow the dough to warm up at all before forming the patties

  • filled the rings half way and cooked them when the dough hit the plastic

  • coated peel with both flour and corn meal

  • buttered the inside of muffin rings

  • dusted the tops of the muffins with flour to at least minimize sticking to the plastic

  • wiped the griddle with a paper towel so only a trace of oil remained

Click to enlarge

So how'd did this change in procedure work out? WOO HOO!

As you can see from the photo, the second batch of muffins is gorgeous. The .8-ounce weaklings became 1-ounce giants.

Perfection though? Nope. And perhaps some difficulties are inevitable. Despite the addition of flour to the cornmeal underneath the muffins I still needed a spatula to get them off the peel, but I accomplished that with much less damage to the muffin. There was also still some sticking to the plastic covering, but, again, much less sticking resulting in less damage to the muffin's structure.

Half of the muffins simply slipped from their rings when I used tongs to turn them over, and the others only stuck because a bit of dough overlapped the ring. They were easily freed.

The crust is still a tad crisper than I'd prefer and although several solutions occur to me, I want to think on it further.

The second batch did taste a bit better, but I can put that down to the longer stay in the fridge and to more air in the muffin. The flavor wasn't significantly improved. This dough is bland — and doesn’t keep well.

But I learned I want a slack dough. I learned (thanks Beth) that it should be formed cold. I learned how to use muffin rings. And I learned that choosing a good marmalade for your breakfast muffin is essential. Actually, I already knew that last one.

Technorati: | | | | | | | |

Labels: , , ,

Click here to continue reading the post and comments...

Thursday, April 19, 2007

Beth: noKnead Bread

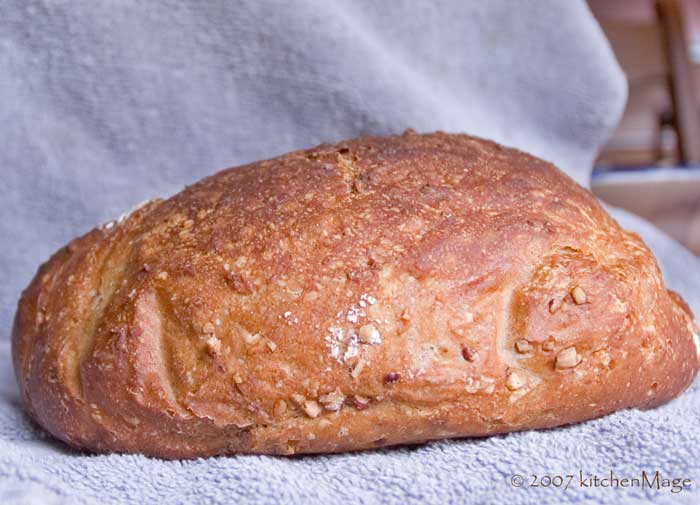
Loaf of twisted, nutty, oatmeal noKnead bread


As the winter of 2006 was closing in, a lot of people were discovering an old approach to making bread. Writing in the New York Times, Mark Bittman described how to make a "no-knead bread" using a very wet (or "slack") dough that is allowed a long, slow rise and then baked in a covered, preheated dutch oven. The results were impressive: bread with a beautiful rustic, open crumb and a near-shatteringly crisp crust.

With 78,000 Google hits for "no-knead bread" there are no doubt thousands, perhaps tens of thousands, of people who overcame their fear of yeast, baked their first loaf of bread, and were thrilled with what they created. They have reason to be proud too. The pictures are gorgeous, and more than a few people describe the crust singing as it cools, which is always a good sign.

I think this is great. Anything that gets people in their kitchens, particularly into scary territory like yeasted bread, is wonderful. Every time I come across a web site where someone has a picture of their very first loaf of bread I smile. More bread bakers makes me happy.

As someone who has been baking bread regularly for decades, however, this recipe is not quite such a huge revelation. I figured out long rise, cold-fermented, slack dough a long time ago and know how to reliably get crispy crust. Perhaps understandably, I was not in a huge rush to try the recipe. In fact, it took me all the way until February to try it, and then I only did it because Susan twisted my arm. Really hard.

The magic behind NoKnead Bread

Reliably turning out great bread at home requires you to master a technique or two and control the proofing and baking environment. This recipe shortcuts a few of these critical aspects of making good rustic bread, making it easier to create a loaf you will be happy to eat fresh out of the oven. While you will probably end up using variations on the original recipe, there are a few things to keep in mind about why this approach works so well:

The rustic open crumb of artisan bread requires slack dough, which can be a hassle to knead and work with. Treating the dough like a batter takes care of that, while the long rise allows for slow, but adequate, gluten development.

Concentrated bottom heat gives the bread more oven spring (rise) and a crispier crust. Baking stones, not preheated dutch ovens, are the usual solution to this problem, although it doesn't deal with the next thing...

Home ovens don't provide the steamy environment required for truly great bread—hence the steam pans, ice cubes, spraying water in the oven for the first few minutes of baking, and so on. By trapping the dough's moisture in the covered dutch oven, you can skip the initial steam creation rituals and let the dough steam itself.

I baked two batches before I wrote about it on kitchenMage and then I wrote: So, what do I think? Well, truth be told, it is great food blog bread. It is very pretty, no doubt about that. Visibly crisp crust. Beautiful open crumb. Yep. That's some gorgeous bread. Photographs beautifully, too. It is also dead simple to produce bread that pretty. The slack dough, long ferment, and baking method combine to make a very forgiving recipe. Served still warm with a slather of butter, it's an impressive loaf, especially for someone who seldom, or never, bakes.

That's not bad…but then I had to go on: Well, except in one aspect. It tastes like...not much. It's not even bad enough to be notable. Flavorless, gummy, and an hour out of the oven the crust starts to toughen.

Ouch! (but wait there's more...) I summed up this bread thusly: Bread to make you believe in the Atkins diet.

So clever. So witty. (So should have shut up.)

So when Kevin and Susan said we absolutely, positively, had to do noknead bread for this site I was a bit nonplussed. If nonplussed means freaked out. There was whining and wheedling, bitching and moaning, and all sorts of carrying on.

I called an executive meeting, at which they reminded me that two was more than one and I was outvoted. I begged and said they could call me a snob on the site if they wanted. They laughed.

Worse, they made me go first!

Bummer. To quote a teenager I know, "sucks to be me..."

This forced me to seriously examine what I didn't like about the recipe and find a way to fix it. So, what was wrong? Well, from my perspective, the bread has three significant down sides:
  • Boring, bland, blah. All white flour meant the bread lacked flavor. The salt in the recipe needed to be doubled. Did I mention the boring white flour?

  • The long rise at room temperature gives the yeast time to digest a lot of the sugars and enzymes that are being broken out of the flour, reducing the flavor. A lot.

  • The covered baking dish often results in a moist, somewhat gummy interior, especially in the center bottom.

The second was easy to fix. I use cold fermentation for bread all the time; clearly this would have to be done that way. A bit of experimentation was all it would take to find the right balance of time and temperature.

The last seemed to be a matter of less covered baking time, maybe with adjustments to time and temperature. (hmmm, time and temperature, I detect a theme…)

The first of these, however, offered me one of those double edged opportunity/danger situations. A quick search online demonstrated that there were already been a lot of variations on this recipe, some more successful than others, in the wild. Herbs, sourdough, chocolate chip (hmmm, chocolate, that helps anything!), mushrooms, cheese… You name it, someone has tried it. Interesting, but this could take a long time and much experimentation and I was on a deadline.

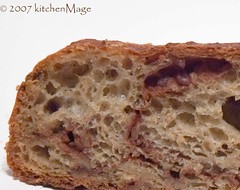
Click to enlarge

Closing in on the date for this post, I was still playing with ideas in my head, not in my kitchen where I needed to be, when I came here to check on comments and found inspiration instead.

You see, two of our most dedicated bakers, Judy and oopsydeb, were talking about Farmgirl's Oatmeal Toasting Bread—one of my favorites—and that made me think of my cinnamon swirl version of Susan's recipe and one thing led to another and I finally went to the kitchen and seven experimental batches later, I give you…

kitchenMage's little bit Twisted, kinda Nuts, noKnead Oatmeal Toasting Bread
(with apologies to Susan)

ingredient US volume | Metric Volume | US weight | Metric
oatmeal 1/2 cup | 118 ml | 2 ounces | 56 grams
brown sugar 2 tablespoons | 30 ml | 1 ounces | 28 grams
boiling water 1 cup | 236 ml | 8 ounces | 224 grams

cold water (or ice) 3/4 cup** | 177 ml | 6 ounces | 168 grams
whole wheat flour 1/4 cup | 59 ml | 1 ounce | 28 grams
bread flour 2 1/4 cups | 532 ml | 10 3/4 ounces | 300 grams
instant yeast 1 1/2 teaspoons | 8 ml | scant 1/4 ounce | 5-6 grams
cinnamon 1/2 teaspoon | 3 ml | 1/8 ounce | 2-3 grams
nutmeg 1/2 teaspoon | 3 ml | 1/8 ounce | 2-3 grams
vanilla extract 1/2 teaspoon | 3 ml | 1/8 ounce | 2-3 grams
salt 2 teaspoons | | 3/8 ounce | 10 grams

Filling
nuts, chopped 1/2 cup | | 2 ounces | 56 grams
cinnamon sugar A few tablespoons or so…it's sprinkling, how exact do you want?

**To measure ice without a scale, pour 2 cups of cold water into a 4 cup measuring cup and add ice until it measures ~2 2/3 cups. Smoosh the ice cubes flat with the water surface, it should then measure 2 3/4 cups. Adjust until it does. Or buy a scale already. Really!

Mixing and fermentation
In a mixing bowl, combine oatmeal, brown sugar and boiling water. Stir well. Cover bowl with clean towel and let cool.

This mixture needs to be no warmer than room temperature before you can continue. How you achieve this is a bit different depending on whether you are using ice or cold water:
Cold water—let the mixture cool to lukewarm, 30-45 minutes and add water.
Ice—wait 10 minutes, add the ice and stir until it melts.

Add the rest of the ingredients and mix until well combined. The dough will be thick enough to scoop a large spoonful and have it stay relatively intact—it's very similar to the texture of well-cooked oatmeal.

Cover the bowl and let the dough rise until doubled in bulk. (This took 3 1/2 hours in my 70° kitchen.)

Refrigerate dough overnight (at least 6 hours).

Shaping and final rise
The next morning, remove dough from the refrigerator and let it warm on the counter for an hour or two. It will still be cool to the touch.

While the dough is warming, chop nuts and mix cinnamon sugar if you don't have some on hand (my standard cinnamon sugars is ~3 parts each brown and white sugar to 1 part cinnamon). Also, cut a piece of parchment paper and place it in the container in which the dough will rise.

Flour the counter and scoop dough onto it.

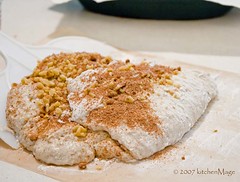
Click to enlarge

The filling is layered into the dough with two tri-folds — like folding a letter to go into an envelope — first in one direction, then the other. Start by nudging the dough into something resembling a rectangle. Sprinkle the dough with a quarter of the nuts and cinnamon sugar. Fold one third of the dough towards the middle, sprinkle with a little more of the goodies. Fold the other third over.

Let the dough rest for a few minutes. It should relax back into a rectangle, more or less. Rotate the dough a quarter turn and repeat the topping process.

Gently place the dough on the parchment and let rise until doubled in bulk. This may take a long time (4-5 hours).

When the dough is about half-risen, put the covered baking container in the oven and preheat it at 450F (230C) for at least 45 minutes, although an hour is better. (I used a 2 1/2 qt, 7 inch wide Calphalon saucepan.) If you have a baking stone, place the pan on the stone to heat.

Baking
Once the dough has doubled in size, place it in the baking pan by lifting the corners of the parchment with the dough on it. Lowering it into the baking pan and cover. Bake for 30 minutes.

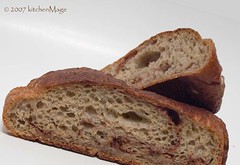
Click to enlarge

Reduce oven temperature to 400F (205C) and uncover the pan. (If you have a stone, remove the pan from oven and finish baking on the stone.) Continue baking until crust is dark brown and the loaf sounds hollow when thumped on the bottom, approximately 30-40 minutes. An instant read thermometer should register 210F (99C). Let cool completely on rack.

Not surprisingly, this makes excellent toast.


Technorati: | | | | | | | |

Labels: ,

Click here to continue reading the post and comments...